Hey! I’m Ashley from Little Yellow Barn. Jourdan and I have been blogging for a year now and couldn’t be happier to have been chosen as contributors on Lil’ Luna!
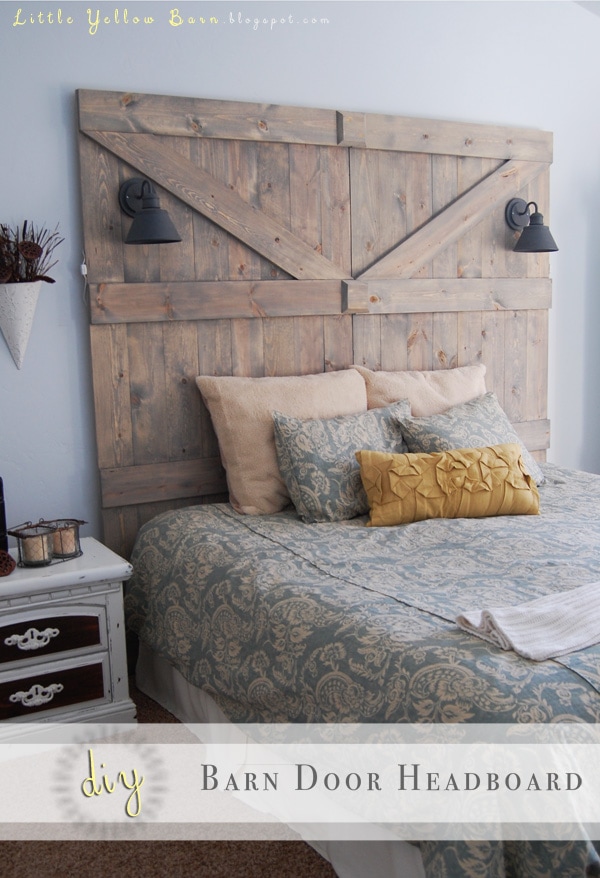
I’ve been drooling over barn door headboards for years now and finally found the perfect one. Simple to make, fit the budget, and most importantly, a willing father to help! My dad came into town for the holidays and we busted this thing out in probably a total of 8 hours all together. It was insane. And the price… that’s the best part. The grand total was under $200!
This was my inspiration for the headboard. I saw it on Pinterest months ago and loved its simplicity…

Unfortunately it didn’t link back to any of the correct places and I couldn’t find a tutorial, so it was kind of made up as we went 🙂 . So here it goes…
DIY Barn Door Headboard
Supplies:
Wood (1×6 8ft) $5.32 each at Home Depot, 22 pieces
Miter Saw
Drill
Hammer
Pipe Clamps
Wood Glue
Screws
Stain
Degreaser
Measuring Tape
Pen
Ok, take a deep breath before you get started, it seems like a lot with too many supplies, but it’s actually pretty easy!
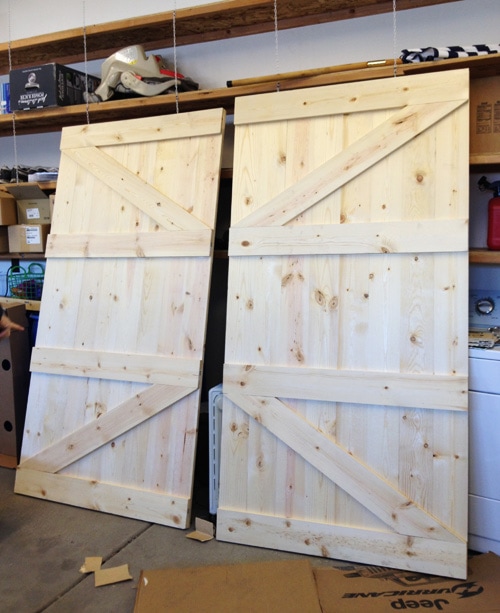
I wanted my headboard 7ft tall (perfect for my ceiling height and still able to fit through standard doors and awkward hallways easily) so start out by deciding how big you want it. Keep in mind the sizing I used is based on a king bed. Cut your vertical pieces of wood to the height you want.
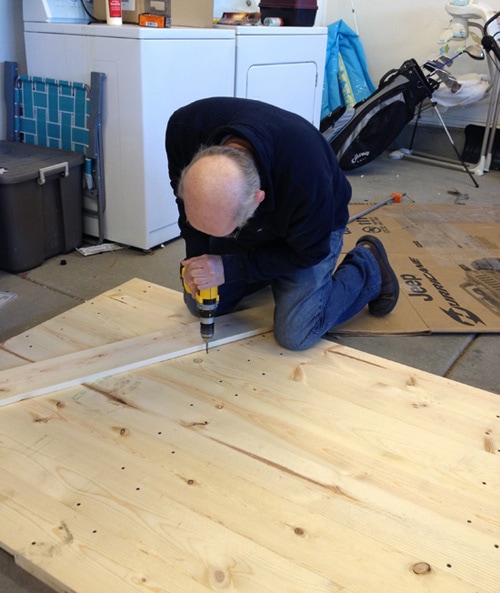
Each barn door will be created separately. First, put together 8 of your vertical boards UPSIDE DOWN and tighten with pipe clamps. Measure the boards across and cut a horizontal piece to fit.
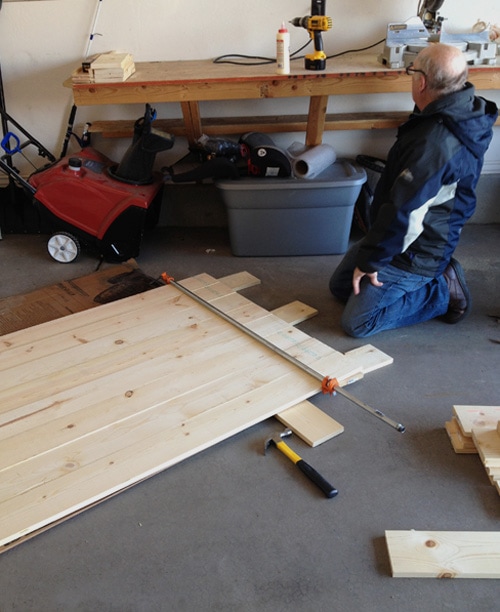
Put wood glue on the back of the board to secure it better.
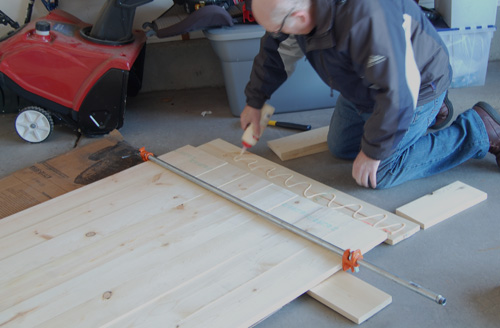
Place the board underneath and use a hammer to secure it and make sure it’s even. Then screw in the board, using 2 screws per vertical board. (Sorry, no screws shown here yet. Keep reading for a visual of the back.)
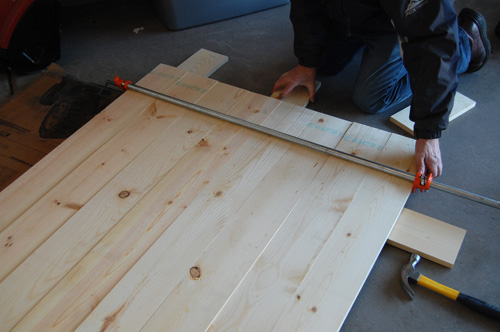
Repeat these steps 3 more times. One at the bottom and two in between, measuring first to make sure they’re even.
Stand the barn door up and holding your top diagonal piece, measure it and use a pen to mark the cut. Repeat for the bottom diagonal piece.

Cover back with wood glue.
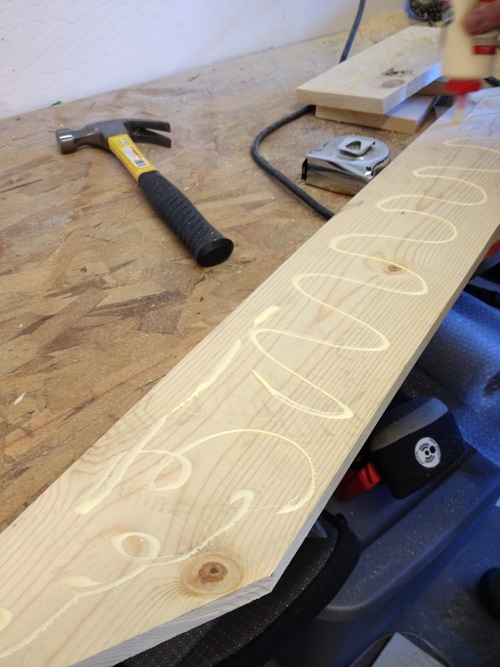
Fit in place. If it doesn’t quite fit perfectly you can shave off a little at a time with your saw.
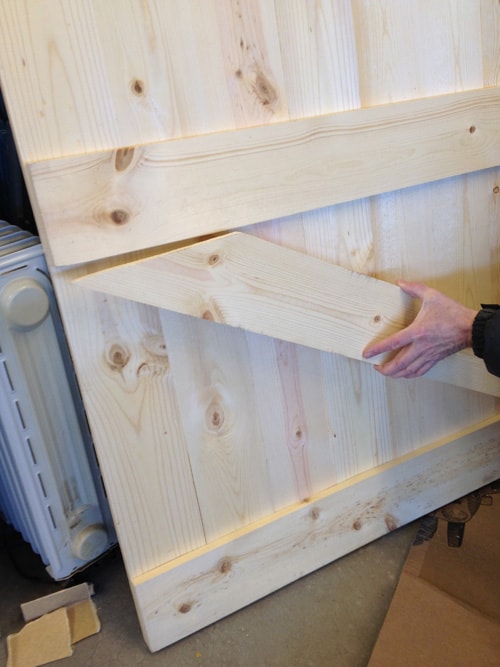
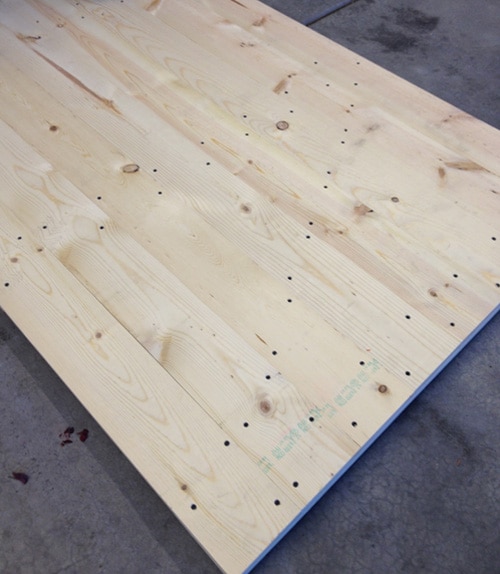
While the door is still upright put a screw on each end of the diagonal pieces (through the back) to secure the board in place. Then lay the entire door flat so you can drill the other screws into the door. Use a board as your guide so you don’t drill your screw through the front.
This is what the back should look like with all the screws in place…
Repeat steps to complete the other side, making sure your diagonal pieces are opposite. When your doors are finished give them a quick sanding, then lift the doors up and smile 🙂 !
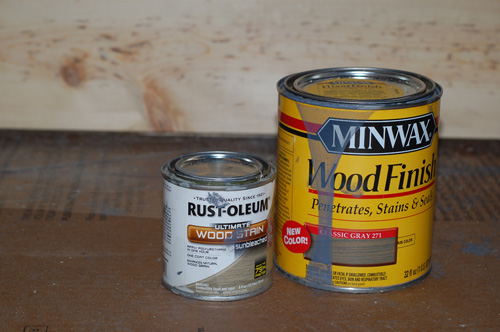
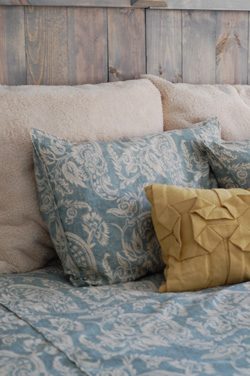
I used a few scrap pieces of wood to test colors and ended up with a mixture of these stains: Rust-oleum “Sunbleached” and Minwax “Classic Gray”. (Not 100% sure you’re supposed to mix brands, but it worked, so I went with it! 🙂 )
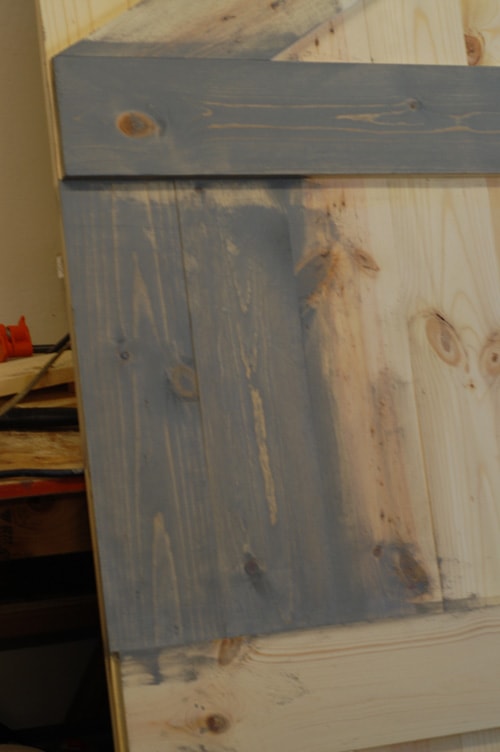
Brush stain on with a paintbrush and quickly wipe off. My stain (of course) took a lot darker on the actual barn door, so I used a wet rag to apply, then rubbed with a degreaser to remove some of the stain and give it that worn look. I ended up scrubbing quite a bit to get the look I wanted.
When you’re happy with the color, wait for it to dry then place your lights (optional). Drill a hole for the cord to come through the back and screw the lights into the board where you want them.
To hang my headboard we screwed three small pieces of wood into the studs of my wall, then drilled three screws diagonally into the top of the headboard and straight through those pieces.
When it was finished one door was sticking out a little more than the other (which was fine by me!), but my dad decided it wasn’t good enough so he cut square, angled pieces to connect both doors.
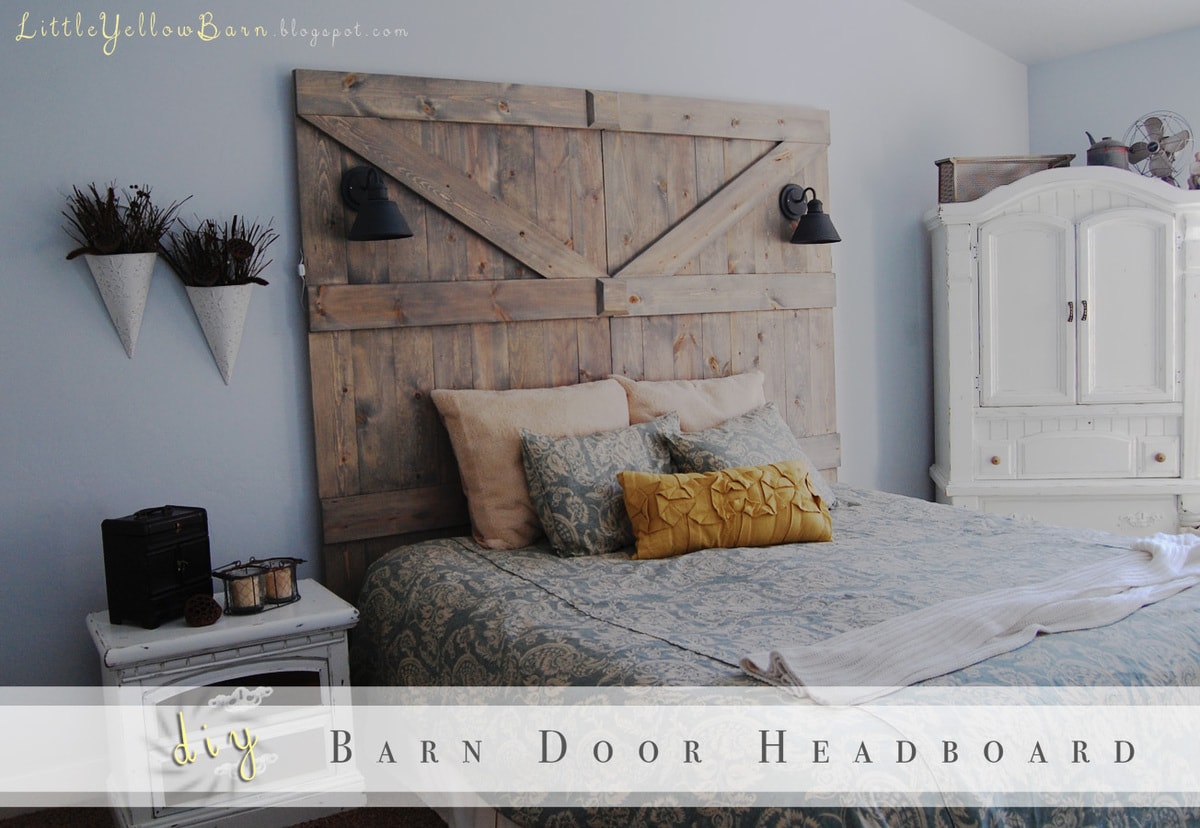

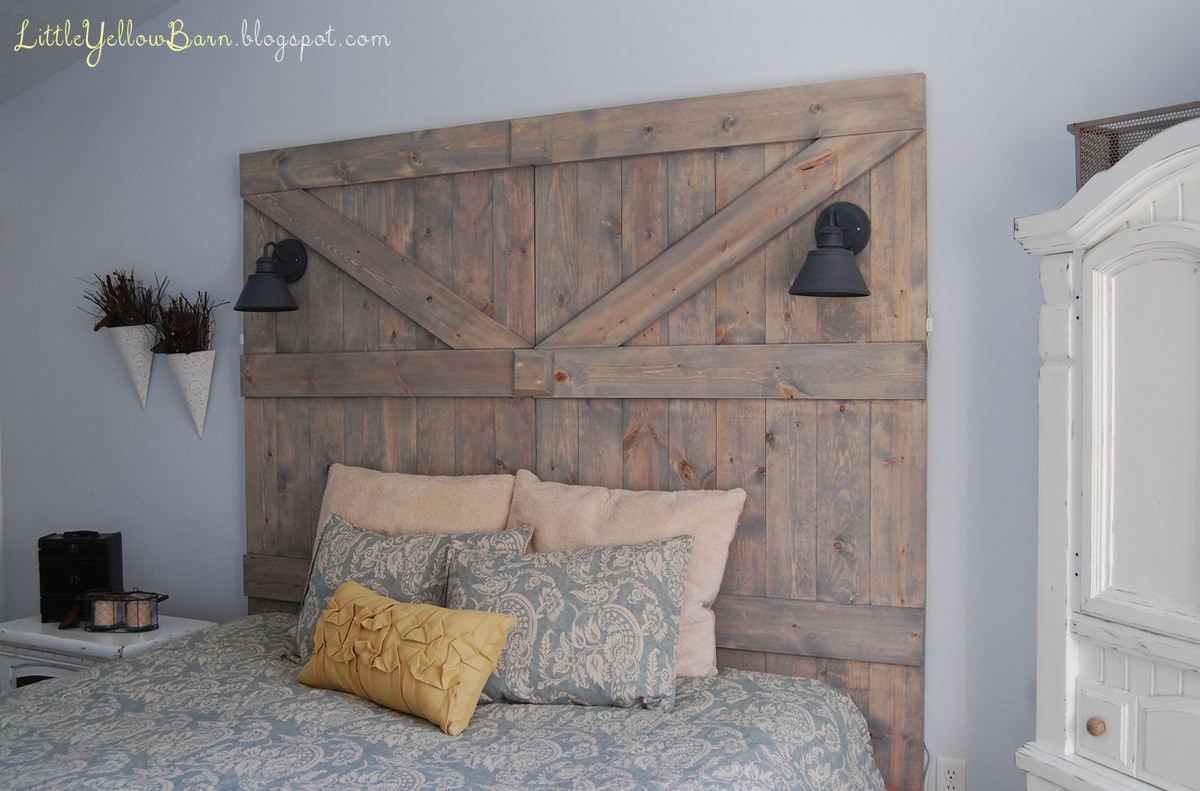
I could not be happier with the results! I finally have the bedroom of my dreams and L.O.V.E walking into my room every single time! It’s fun, it’s different, and totally me!
If you have any questions about it I’d love to help! Send an email to [email protected] .
——————————————————-
How gorgeous is this headboard!? I think I’m in LOVE!!
Be sure to go to Little Yellow Barn for more fun projects from Jourdan and Ashley, and
for more information about her please go HERE.
For more great DIY projects be sure to check out:

For all DIY projects go HERE.
For all Decor ideas go HERE.
And get weekly emails with monthly freebies by signing up for the Lil’ Luna newsletter. 🙂
For even more great ideas follow me on Facebook – Pinterest – Instagram – Twitter – Periscope – Snapchat.
Don’t miss a thing – Sign up for the Lil’ Luna Newsletter today!
ENJOY!


I already have a headboard but if I didn’t, this would SO be on my Hubby’s to do list this weekend. Love it.
So Beautifully, Amazing!!! Love Love Love it… Pinning it 🙂
xo
Angelina
I LOVE this!! Been looking for a good tutorial. Thanks for having her share!! <3
I tired to click on the little yellow barn link at the top of the post and it didn’t work! Shoot! Hate it when that happens. Lucky for me the one at the bottom worked. Maybe check on that so people can find your blog!
Love the headboard by the way! Aren’t dads GREAT!
So creative and beautiful! It looks great with the lamps hanging it. Love it 🙂
Stunning – I love the way you painted it to look weathered.
What a gorgeous headboard!! 🙂 It turned out beautifully!
LOVE this headboard!!!!
I absolutely love this headboard! My teenager wants one for her new room makeover. Who knew! It turned out really aged looking.
My Mom would LOVE this! I just showed it to her and she’s going to email this link to her boyfriend. 🙂
Love the design! Where did you purchase the light fixtures and are they hardwired or can you turn them on and off with a switch on the fixture?
Thank you
We have just completed the barn door headboard. I have been searching for lighting to attach to it. Can you tell me the manufacturer, model #, any info that you might have on the fixtures that are in the photo? I can’t wait to finish the project.
I LOVE THIS! Thanks for sharing. I’ve featured your project on Friday’s Five Features at DIY Vintage Chic. Keep up the great work! http://diy-vintage-chic.blogspot.com/2013/07/fridays-five-features-july-26th-2013_26.html
Hi!
Love the headboard. I was wondering what kind of wood you used?
Thanks much!
Where did you get your lights? I love them and have been looking for something very similar!
What a beautiful headboard! I love the lighting you used. It is exactly what I’m looking for. Do you mind sharing where you purchases them?
Love this! Where did you find your lights?
Yours looks absolutely stunning! Can you give me some more details on how you hung the headboard? I have a real old barn door from a barn my husband’s family tore down. It’s smaller, I am using it as a headboard in my guest room and am still trying to figure out the best way to hang it. Thanks!
Hi! Love the barn door look! Quick question though do you remember where you purchased the lights you added into it? And are they plug ins? Thanks!!
Jasmin
Great project! Where can I find those lights?
Kristyn, I have a suggestion for you, as to the way I would install it to the wall. A few words of explanation: I’m self-employed, and work for interior designers as a wholesaler. I make beautiful things, such as padded cornices, padded headboards, and window treatments. Or anything pretty much custom, that they want made. I also tend to install my work, because only I will take the pride in making the last step as nice as the previous ones.
What I would do, would be to arrive at the home, and bring the headboard to the bedroom in the two pieces. In order to get them as one, I would have two-three preset boards that I would screw to the back of both pieces, in order to make both doors one. That way you will eliminate the unevenness your father didn’t like. And note, the top board would have one end cut as a 30-45 degree angle, with that side facing down and at an incline. Then I would install another board, also with the same angle, and screw it to the wall, into the studs. But I would make this board about eight inches shorter than the width of the headboard. Once this was done, and after setting up the lights, I would pick up the headboard and set it on to the angled wall board. Perfect fit every time. No need to do anything else. fertig!
The reason why I would cut the board eight inches shorter, is because there would be more flexibility with the arrangement of the room. If you bought a larger side table, and the placement of the bed needed to be shifted a few inches, all you would have to do is just slide the headboard over and Voila!, everything would be perfect again. Its probably too late now, but just keep this in mind for the next time.
Great Job!
John
Hi Kristyn….I am the designer of that bedroom! Don’t feel bad because we bought those old doors from a flea market so there isn’t a tutorial on how to build them! The lights were from Pottery Barn and we just drilled a hole in the doors to plug them in….you did a great job on your version:)
Sherry
Looking forward to building this project fir my daughter-one question. How did you attach the bed to the headboard?
Where did you find the corded lights for the headboard?
My partner and i have fun with, bring about I came across precisely what I’d been looking for. You’ve got was over our four day time lengthy hunt! Our god Many thanks guy. Have a very excellent time. Ok bye My partner and i have fun with, bring about I came across precisely what I’d been looking for. You’ve got was over our four day time lengthy hunt! Our god Many thanks guy. Have a very excellent time. Ok bye
This looks amazing. Getting ready to make this for one of the rooms in our lake house. There must be a shortage of common (pine) boards. I just paid $8.98 per 1″x6″x8′ board compared to your $5.32 back in 2012/2013. Also, not easy to find a good-looking, matching-style light that doesn’t break the bank. Still on the hunt, but thanks for posting this!
You’re welcome!! Did you make it yet? I’d love to hear how it turned it or see pictures!!
Very nice, and I’ll probably use this idea on a finished basement area. Thank you for sharing. I have been looking all over trying to find a cheaper version on a headboard.
Your explanation was really clear.
Oh, thank you so much!! Glad you found it. Good luck!
How high are your ceilings?
Not sure making 7ft tall as you did is appropriate for 8’6″ ceilings.
Rhanjs
How high is your ceilings?
This post is from a contributor, so I am not sure how tall her ceilings are? But, you are probably right. You’d want tall ceilings or a shorter headboard.
What degreaser did you use to age the stain on the wood headboard? It’s beautiful and my husband and I are looking at doing this for our room. Also, was your bed a queen or king as we will need to adjust the size possibly.
This post is from Ashley at http://www.littleyellowbarn.blogspot.com/. She will better answer your questions 🙂 It is a super cute idea & hope you get your answers!