This post may contain affiliate links. Please read our disclosure policy.
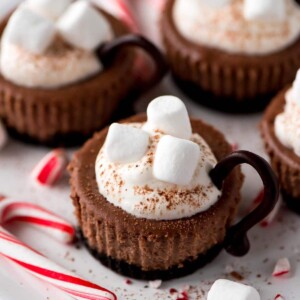
These Hot Cocoa Cheesecake Minis are the cutest and most delicious way to enjoy the winter season and spread Christmas cheer.
No one will be able to pass these Hot Cocoa Cheesecake Minis up at your holiday party! Try tasty Gingerbread Cookies, Christmas Tree Brownies, and Frozen Hot Chocolate for more edible Christmas goodies!

The Cutest Holiday Cheesecakes
If there is one dessert I cannot pass up, it’s cheesecake!
It’s rich, creamy, and smooth, yet still has texture from the crust. And, the toppings and flavor combinations are endless. Today, I’m sharing the most adorable little Hot Cocoa Cheesecake Minis.
Making a giant cheesecake can seem overwhelming because of how long it takes and how many people you need to eat it up.
I love mini cheesecakes because it comes together in just under 4 hours. No having to wait overnight to eat cheesecake! Plus, they’re already perfectly portioned for serving.
These little guys only take 22 minutes to bake and then 2-3 hours to cool/chill. Yeah, cheesecake you can make at noon and eat before dinner.
But first you gotta top these babies with homemade whipped cream, a sprinkling of cocoa powder, crushed candy cane, a few marshmallows and a little handle made out of chocolate.

How to make hot cocoa cheesecake minis
PREP. Heat oven to 325°F.
CRUST. Pulse Oreo in a food processor until you have a crumb texture. Combine cookie crumbs and butter; press onto bottoms of 12 paper-lined regular-size muffin cups. Bake 8 min.
FILLING. Beat cream cheese, 1/2 cup sugar and 1/4 cup cocoa powder in medium bowl with mixer until blended. Add eggs, 1 at a time, mixing on low speed after each just until blended. Spoon over crusts.
Tip. To get a smooth, properly risen cheesecake first soften the PHILADELPHIA Cream Cheese (microwaving at 50% power until middle is softened), beat the until smooth with no clumps, then add the eggs one at a time until just incorporated (be sure not to overbeat).
BAKE + CHILL. Bake 22 to 25 min. or until centers are almost set. Cool completely. Refrigerate 2 hours.
CHOCOLATE HANDLES. Meanwhile, make the chocolate handles. Cover a baking sheet with parchment. Melt semi-sweet chocolate as directed on package, then spoon it into resealable plastic bag. Cut a small piece off one bottom corner of bag. Squeeze the chocolate into 12 handle shapes on the prepared baking sheet. Freeze until ready to use.
DECORATE. Remove paper liners from cheesecakes. Beat cream and remaining sugar in separate medium bowl with mixer on high speed until soft peaks form; spoon onto cheesecakes. Sprinkle with remaining cocoa powder; top with marshmallows (we even added crushed candy canes for an extra flair). Gently press chocolate handle into side of each cheesecake.
Recipe Notes
- Cream Cheese: When making cheesecake, it’s important to use high quality cream cheese– PHILADELPHIA Cream Cheese. It’s perfectly smooth, creamy, and holds up nicely.
- Cocoa: This recipe is created by using cocoa powder. Be sure that you don’t accidentally use hot cocoa mix. It will drastically change the overall taste of the cheesecake.
- Creamy: To make the cheesecake creamy you will want to use room temperature cream cheese & eggs and avoid overmixing the ingredients.
- Oreos: When crushing the Oreos, you do not need to scrape off the cream center. The cream gets chopped up right along with the cookie. You can’t see it, but it helps give sweetness to the crust as well as helps it hold its shape.
- Handles: Instead of making your own chocolate handles another idea is to use mini candy canes.
- Liners: Use silicone cupcake liners. Not only do the cheesecakes slide right out, they are reusable.

Recipe Tips + Variations
Handles: You want to make sure that the handles are the same sizes and shapes. They also need to be a proportional size when paired with the cheesecake. Many people are good at eyeballing it, but others need a little help.
- Use a black permanent marker to draw 12 identical handles onto the parchment paper.
- Turn the paper over. You should be able to see the marker through the paper.
- Pipe the chocolate directly on top of the marker.
- You will need to adjust the amount of semi sweet chocolate you use based on the size and shape of your handles. It’s always a good idea to have a little extra on hand just in case you need it.
No bake version: I have not tried using a no bake recipe for this treat. I worry that they would not hold their shape as well as this recipe requires. The minis need to stay very firm, which I felt was better achieved with a baked cheesecake recipe. Thankfully, they only need 22 minutes to bake and you don’t need any specialty pans or a water bath.
Make them mini-er: This recipe is a mini version of cheesecake, but you can make them even mini-er by using a mini muffin pan. You will get a much larger yield and will have to shorten the bake time, otherwise the instructions are the same.

Storing Info
Make the chocolate handles and cheesecakes ahead of time, but I don’t suggest making the whipped cream ahead of time because it could fall and not be as airy as you need it to.
STORE Mini cheesecakes in the refrigerator. Ideally in an airtight Tupperware container with a lid. They will last for about a week.
FREEZE up to 6 months in an airtight container. Separate the layers with parchment paper.

For More individual Cheesecake Recipes, try:
- Cherry Cheesecake Cupcakes
- Cheesecake Strawberries
- Cheesecake Bites
- Mini Peanut Butter Cheesecakes
- No Bake Strawberry Nutella Cheesecakes
Hot Cocoa Cheesecake Minis Recipe
Equipment
- 12 Count Regular Size Muffin Tin
Ingredients
- 10 OREO cookies
- 1 tablespoon butter, melted
- 2 8 ounce packages PHILADELPHIA Cream Cheese, softened
- 1/2 cup +1 teaspoon sugar, divided
- 1/4 cup +1/2 teaspoon unsweetened cocoa powder, divided
- 2 eggs
- 2-4 ounces BAKER’S semi-sweet chocolate depending on the size of your handles
- 3/4 cup heavy whipping cream
- 1/2 cup mini marshmallows
Instructions
- Heat oven to 325°F.
- Pulse Oreo in a food processor until you have a crumb texture. Combine cookie crumbs and butter; press onto bottoms of 12 paper-lined regular-size muffin cups. Bake 8 min.
- Beat cream cheese, 1/2 cup sugar and 1/4 cup cocoa powder in medium bowl with mixer until blended. Add eggs, 1 at a time, mixing on low speed after each just until blended. Spoon over crusts.
- Bake 22 to 25 min. or until centers are almost set. Cool completely. Refrigerate 2 hours.
- Meanwhile, make the chocolate handles. Cover a baking sheet with parchment. Melt semi-sweet chocolate as directed on package, then spoon it into resealable plastic bag. Cut a small piece off one bottom corner of bag. Squeeze the chocolate into 12 handle shapes on the prepared baking sheet. Freeze until ready to use.
- Remove paper liners from cheesecakes. Beat cream and remaining sugar in separate medium bowl with mixer on high speed until soft peaks form; spoon onto cheesecakes. Sprinkle with remaining cocoa powder; top with marshmallows (we even added crushed candy canes for an extra flair). Gently press chocolate handle into side of each cheesecake.
Video
Nutrition
Nutrition information is automatically calculated, so should only be used as an approximation.
This post is sponsored by PHILADELPHIA Cream Cheese. As always, all opinions are 100% my own.


To use extra small liners what temperature
and how long would you bake them?
I’d keep the same oven temp, but reduce the baking time. Maybe start checking around 10 minutes and go from there.
Great recipe and was a hit at our ladies church Christmas party this year. Texture came out to where they just melt in your mouth. Not super sweet and the whipped topping stayed up for three hours and did not deflate or melt at all. The recipe was easy and if you use the helpful tips they give you outside of just following the recipe, it really does make a difference. The only thing I would recommend to anyone is that when you put the chocolate handles on, possibly use a clean tweezer that you’ve had in the freezer with the handles. Putting the first eight handles on was no issue by hand. After that, the chocolate had warmed a bit sitting outside the freezer for those few minutes and my fingers started to melt the handles so that they were breaking in the middle by the time I got them onto the cups. Always make extras and possibly make them thicker than I did! I only did one line pass with the chocolate which made the handles thin. Next time, I may also crush up some mini candy canes to sprinkle over the top to add a little extra mint kick but nothing to overpower the great rich chocolate flavor that’s already there.
tops of my cupcakes deflated; not enough chocolate to make more then 4 handles and they were thin handles..will not be making again
This was absolutely delicious and everyone loved it. There were some left over and the whip cream was still good the next day. Thank you for this great recipe.
You are so welcome!! I am glad it was a hit. Thank you 🙂
These taste great, and they’re so easy to make!
i am disabled and can’t stand in the kitchen for long periods, so i like simple recipes with minimal prep/cleanup; i needed an idea for a workplace holiday potluck, and was so excited to find these.
i have made cheesecakes before, but this is my first time making mini ones~ i made a few tweaks to save myself time and spoons as well:
i used peppermint bark oreos as my base, and whipped cream as a topping, with mini candy canes as the handles. i then sprinkled them with crushed candy cane, for a lovely, slightly minty flavour. i love that the cake itself isn’t overly sweet or rich; it’s hard sometimes, to find that balance, but these are perfect and i’m sure they’ll be a hit at the party!
i will definitely make these again.
Oh, thank you so much for sharing that. I am so happy to share simple recipes 🙂