This post may contain affiliate links. Please read our disclosure policy.
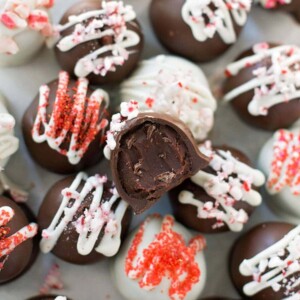
Easy homemade peppermint chocolate truffles are simple and the perfect addition to any holiday party or cookie tray.
Candy is a perfect addition to the cookies and brownies on your holiday spread. Peppermint Chocolate Truffles are one of our favorites!!

Chocolate Truffles
I’m back with a minty, festive candy recipe perfect for the holidays. Don’t you think these truffles would be a welcome addition to Christmas cookie trays? I do (along with our Christmas Crack and Homemade Turtles)!
Candy making does not need to be intimidating. There are so many quick, easy recipes out there. While this one isn’t necessarily quick, it is easy! Plus it doesn’t involve tempering chocolate which is always a huge bonus.
Let the truffles chill until the coating is completely set. Then add to your holiday platters or stash in your fridge for your family to snack on during all of the festivities.

How to Make Chocolate Truffles
TRUFFLE FILLING.
To make the filling for the truffles you’ll need:
- quality semisweet chocolate
- heavy cream
- peppermint extract
- vanilla extract
Heat the chocolate and the cream in the microwave, then stir in the extracts. Let the mixture sit at room temperature, then pop it in the refrigerator to firm up for at least four hours. I prefer letting it chill for at least 6 or even overnight.
SCOOP. When the filling is ready, use a small cookie scoop (about 2 teaspoons) to form balls. Quickly roll in your hands to create a smooth surface.
DIP. To dip the truffles you either need to insert toothpicks into the centers or use a chocolate dipping fork.
CHILL. Return the balls to the refrigerator to chill for at least 30 minutes. You want them nice and cold before they get dipped in a warm coating.
COAT. For the coating, warm white or dark chocolate candy melts until smooth. Dip the truffles and swirl to remove excess chocolate. Place them back onto the lined baking sheet, then use the remaining chocolate to add a drizzle over top.
DECORATE. To decorate the peppermint chocolate truffles you can use crushed candy canes, sprinkles, sea salt, or nuts.

Recipe Tips
Make other varieties of truffles: Change them up based on the extract you add or the chocolate you use to coat it with (milk, white or dark chocolate).
Change the toppings: from sprinkles to chopped nuts to mini chocolate chips or crushed candy, those toppings will also add flavor and change up the recipe.
Ganache:
- The ingredients need to be incorporated completely so they set up correctly.
- Make sure to let the truffles sit in the fridge for long enough to set.
- Do not use substitutions like half and half, this will not give you the same great texture as heavy whipping cream!
- There is a difference between mint and peppermint extract; peppermint is the best choice for baking, especially with chocolate.
- After being chilled for a while and the ganache still isn’t thick enough you can try reheating it and adding more chocolate. You can also try letting it warm up and mixing in powdered sugar.
More Tips:
- Crush the candy canes with a food processor, or in a Ziploc bag with a rolling pin
- If you don’t want to melt the candy wafers in the microwave you can do a double boiler pretty easily.
- If you’re serving these at a party you could leave the toothpicks in, if you are packaging them for a gift make sure to remove the toothpicks
- A melon baller is a great size scoop for truffles!

How to Store
STORE truffles in an airtight container for two week, or longer in the fridge. Consider layering them between pieces of parchment paper.
FREEZE for up to 1 month. Do not leave these out at room temperature for too long or you risk the ganache filling becoming really soft and it makes it hard to hold the truffle.

For more holiday candy recipes:
- Christmas Crack
- Toffee Recipe
- Homemade Butter Mints
- Chocolate Fudge
- Homemade Caramels
- Peppermint Oreo Fudge
Peppermint Chocolate Truffle Recipe
Ingredients
- 16 oz. chopped semisweet chocolate I used four 4 oz. bars
- 1 c. heavy whipping cream
- 2 tsp. peppermint extract
- 1 tsp. vanilla extract
For the coating:
- 16 oz. Ghirardelli Dark or White Melting Wafers
- 1/4 c. finely crushed peppermint candy canes or sprinkles
Instructions
- In a medium size glass bowl, combine the chocolate chips with the heavy cream. Microwave on HIGH for 1 minute, then whisk. Microwave for 30 seconds on HIGH, then whisk. Repeat if necessary until smooth. Whisk in extracts.
- Cover the bowl with plastic wrap and let stand at room temperature for 30 minutes. Transfer to the refrigerator and allow to chill for 4-6 hours or until the mixture is firm.
- Line a baking sheet with parchment paper or silicone baking mats. Remove the chocolate from the fridge. Working quickly, use a small cookie scoop (2 teaspoons in size) to scoop and roll into smooth, round balls.
- Add a toothpick into the center of each ball. Chill for 1 hour.
- In a glass mason jar or a microwave-safe drinking glass, melt half of melting wafers. Microwave on HIGH for 1 minute, then 30 second increments until smooth. Let cool for 5 minutes, stirring every minute or so.
- Using the toothpick, dip the truffle into the chocolate, swirling until completely coated. Shake any excess chocolate back into the glass. Return to the lined baking sheet. Repeat until finished using remaining 8 oz. of chocolate.
- Drizzle tops with remaining melted chocolate, then sprinkle on crushed candy canes (or sprinkles) if desired.
- Return to the refrigerator and chill for 30 minutes before serving. Store in an airtight container for up to 2 weeks.
Notes
- You can use a fork or a special dipping fork (for chocolate making) instead of the toothpicks.
- I prefer not to put candies in the truffles because it make them lumpy.
Nutrition
Nutrition information is automatically calculated, so should only be used as an approximation.
Thank you for sharing, Natalie from Life Made Simple.

I plan to make for Christmas. They look so delicious.
My ganache never set up. It’s been chilling for more than 24 hours and is still too soft to roll into balls. I double checked the amounts of each ingredient and followed the recipe exactly. Any idea why it wont set up and what i can do to salvadge this?
So, the filing didn’t firm up?
These truffles are delicious! I love how quick they are to make too!
perfect for neighbor gifts and christmas fun with the kids!
Totally!! I’d love it as a gift 🙂