This post may contain affiliate links. Please read our disclosure policy.
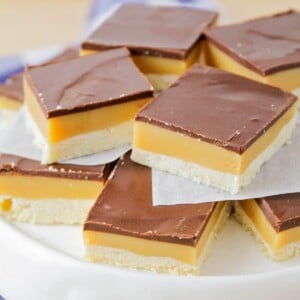
These millionaire bars have a perfectly crumbly crust, an ooey gooey caramel middle, and a thin layer of delicious semi-sweet chocolate on top. They definitely earn their name!
Bar desserts are convenient for parties and gatherings, because you make them in a single pan, but they make several servings. We love these millionaire bars as much as our sugar cookie bars and magic bars!

Homemade Twix Bars? Yes, Please!
As you know, our family is a sucker for trying out new, delicious, treats. When we saw these millionaire bars (aka Twix Bars) for the first time, we knew we had to try them. I mean, anything that has that has THAT MUCH caramel in it, has to be awesome, right? Right!
These Millionaire Bars were simple to put together and oh-so yummy to eat! They tasted just like a TWIX BAR with a crumbly shortbread bottom, an ooey gooey middle, and a perfectly thin layer of chocolate on top.
Homemade bar forms of Twix candy? Oh yeah! I think it’s safe to say they are definitely our current favorite dessert. Try them out and let us know if you think they hold up to their title.
For more candy bars you can make at home, try Salted Peanut Chews, Oh Henry Bars, and Snickers Brownie Bites.

The three delicious layers
This treat is well worth the wait. Make sure you give yourself ample time to complete all the steps so each layer can set properly. The combination of the flavors in all three layers is so irresistible!
SHORTBREAD CRUST. Combine flour, baking powder and salt in a small bowl and set aside. In a large bowl, beat butter and sugar with a mixer until light and fluffy. Add in your flour mixture until just incorporated.
Spread into an 8 x 8″ baking pan lined with parchment paper. Bake at 325°F for 15-18 minutes, or until lightly golden brown.
CARAMEL FILLING. Combine butter, sugar, corn syrup and condensed milk in a saucepan over medium-high heat. Stir occasionally, until smooth and the butter is melted.
Bring to boil, then reduce heat to low, stirring constantly, until the mixture thickens a bit and turns amber color.
Spread over the shortbread layer and let cool completely. Once cooled, let set in the fridge for a few hours or overnight.
CHOCOLATE GLAZE. For the chocolate glaze, heat butter and corn syrup in a small saucepan until melted. Remove from heat, add chocolate (make sure it’s high quality chocolate), and stir until melted.
Immediately pour over the condensed milk layer. Cool completely and chill for a few hours before cutting into squares.
Want a marbled effect? spread chocolate as directed. The add 6-8 dollops of white chocolate. Use a spoon to swirl the white chocolate with the dark.

Just in case you have leftovers
Which we doubt. 😉
I can promise you these bars won’t last long at all, but if by some miracle you have leftovers, this is how to keep them fresh.
- Countertop: store covered for 3-5 days.
- Fridge: store covered for up to 2 weeks. If they have not been pre cut let the bars warm up a little at room temperature before slicing otherwise the top layer of chocolate may crack.
- Freezer: Once completely set and cooled. Wrap with plastic and again with aluminum foil. Label and freeze for up to 3 months. Thaw and serve.
I could seriously eat a whole pan full of these on my own!

For more of our favorite bars, check out:
- M&M Chocolate Oat Bars
- Cookie Bars
- Banana Bars
- Sugar Cookie Bars
- Oh Henry Bars
- Butterscotch Brownies
Millionaire Bars Recipe
Ingredients
Base
- 1 cup all-purpose flour
- 1 tsp baking powder
- 1/4 tsp salt
- 1/2 cup unsalted butter room temperature
- 1/4 cup sugar
Caramel
- 1/2 cup unsalted butter cut into pieces
- 1/2 cup sugar
- 2 tbsp light corn syrup
- 14 oz sweetened condensed milk
Topping
- 3.5 oz milk chocolate finely chopped, or semisweet chocolate
- 1/2 tsp light corn syrup
- 1/4 cup unsalted butter cut into pieces
Instructions
- Combine flour, baking powder and salt in a small bowl and set aside. In a large bowl, beat butter and sugar with a mixer until light and fluffy. Add in your flour mixture until just incorporated. Spread into an 8 x 8" baking pan lined with parchment paper. Bake at 325 for 15-18 minutes or until lightly golden brown.
- For the filling, combine butter, sugar, corn syrup and condensed milk in a saucepan over medium-high heat. Stir occasionally, until smooth and the butter is melted. Bring to boil, then reduce heat to low, stirring constantly, until the mixture thickens a bit and turns amber color. Spread over the shortbread layer and let cool completely. Once cooled, let set in the fridge for a few hours or overnight.
- For the chocolate glaze, heat butter and corn syrup in a small saucepan until melted. Remove from heat, add chocolate and stir until melted. Immediately pour over the condensed milk layer. Cool completely and chill for a few hours before cutting into squares.
Nutrition
Nutrition information is automatically calculated, so should only be used as an approximation.
Adapted from Collecting Memories.


It is a process making it but it came out EXACTLY like the picture. It is absolutely delish but a little too sweet for me. I cut the pieces into small bite size chunks and enjoyed them with friends and hubs (who thought they were amazing). I would like to know how to take the sweetness down a bit.
I cannot get the caramel to work at all, doing it exactly according to the recipe. I never going to use this site again.
This is literally the worst recipe I have ever tried to make…
Sorry to hear that. Thanks for the feedback and for giving the recipe a try!
The shortbread and the chocolate layer are great, however my caramel became almost rock hard and hurting my teeth to eat.. it does taste good but not the right consistency at all.. I’m bummed! I wonder why?
Just kidding. My fridge froze the caramel, it’s all good now! Yum
Oh good! I’m so glad to hear it turned out well and wasn’t an issue of overcooking. So happy to hear you enjoyed the bars!
Typically if caramel gets hard like that it has been cooked too long. So if you make the recipe again, keep a close eye on the color of the caramel. Once it starts turning a light amber color, it should be done.
Base and Caramel are delicious but you are better off just melting chcolate for the top and not using butter… makes the whole thing tastes only of butter
Thanks so much for the feedback and for trying it out!
How do I adjust ingredients for a 9x 13” pan?
I would probably double the ingredients. Not sure if the baking time would be the same. I would just keep an eye around the same time.
We just made these this year…so good! This is a new family favorite!
These are the best!
These are truly decadent and worth the time. I added a sprinkle of flake salt to after the chocolate layer. Yum! Thank yOu for the fantastic recipe!
You are so welcome!! Thank you for saying that. I am glad to share 🙂
This tasted fantastic, but I couldn’t get my caramel to the same color as you guys. I didn’t use any corn syrup, however, so that could be why. Even without corn syrup, this was still great.
Could have been why. I am glad you still liked them 🙂
These are delicious and look great on a display tower.
These really do taste like a million bucks! So addicting! Next time I need to REMEMBER to share with the neighbors….almost ate them all myself…lol
Super easy to make and taste delicious!!
These really are so delicious! I love the layers! It’s creamy, gooey, & so good!
These look so yummy Kellyn! I’m seriously drooling right now! 🙂
Haha!!! Thanks Kara!!
I made these for a Christmas party celebrating our volunteers. They are seriously yummy and special! I sprinkled crumbled peppermint candy on the top since it was Christmas. I individually wrapped them and tied them w a ribbon. I’m getting requests for the recipe from many people!