This post may contain affiliate links. Please read our disclosure policy.
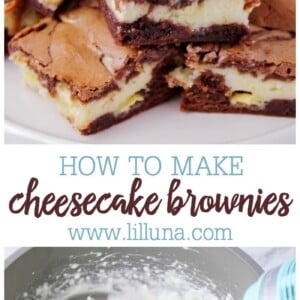
These cheesecake brownies are next level, with a delicious cream cheese and white chocolate layer sandwiched between two rich layers of brownie.
There are so many ways to add a little extra something to your brownies! This cream cheese version is delicious, but you also need to try Oreo Brownies, S’mores Brownies, and Cookie Dough Brownies.

cream cheese Brownies
Who loves BROWNIES?! The chocolate-y treats are one of my “go-to” desserts when company comes over, so I like to have several different brownie recipes on hand.
When my family saw a recipe for Cheesecake Brownies (aka Cream Cheese Brownies), they decided to give them a try. Let’s just say I’m so glad they did because this recipe was GREAT!! Let me tell you why…
- Brownies on their own are simply delicious!
- A cheesecake layer in between means you can’t go wrong!
- White chocolate chips in the Cheesecake layer make them even better!
SEE! You really can’t go wrong with this recipe. There are a few more steps than the brownies in a box, but I promise they won’t disappoint. If you’re looking for a way to elevate an already delicious dessert, I definitely suggest trying this recipe!

How to Make Cheesecake Brownies
Preheat oven to 350.
CREAM CHEESE MIXTURE. In a mixing bowl, combine cream cheese, ¼ cup sugar and 1 egg and beat until smooth. Stir in 1 cup white chocolate chips until well combined. Set aside.
BROWNIE BATTER. On the stove, fill a saucepan with water and bring to a boil. Turn off heat and set a heatproof mixing bowl over the water. In the mixing bowl, combine butter and milk chocolate chips; stir until it’s just melted and blended together. Mix in the remaining ½ cup sugar and 2 eggs.
In a separate bowl, mix your flour, baking powder, and salt; stir into your chocolate mixture until evenly blended.
LAYER. Pour half of your batter into a greased 9×9 baking pan. Spread the cream cheese mixture over the chocolate layer. Top with remaining chocolate mixture. Swirl the top chocolate layer into the cream cheese to make a marble pattern.
BAKE. Bake at 350 degrees for 25 to 30 minutes, or until top is crinkled and center is cooked through. Let cool. ENJOY!
Bake time tips: The worst thing is anticipating a delicious treat only to remove it from the oven far from the expected result. Unfortunately, is can be hard to pinpoint exactly why a recipe worked for one person and not the other. Here are a few more common tips to keep in mind when baking:
- Glass and dark metal pans take longer to bake.
- Using a different pan size than the one suggested. Smaller sized pans require extra bake time. Larger sized pan need less bake time.
- Making your own adjustments to the ingredients. Baking is a science and any change to the recipe can result in an unexpected outcome.
- Elevation and weather can affect baked items.
- The toothpick test: don’t wait until the toothpick comes out clean. This means your brownies have been over cooked. When stuck in the center the toothpick should have some crumbs stuck to it.
- Allow the brownies to cool and set. The brownies will continue to bake right out of the oven and set as they cool.
Can I use a box mix? The cheesecake layer is best when paired with the homemade brownie as listed in the recipe, but you can use a box brownie mix. You will get a different texture, but it will still taste delicious. Also, I suggest finding a brownie mix that is baked in a 9X9 pan.

cheesecake brownie Tips and Tricks
Add even more flavor: I typically make these brownies as written, but you can add other flavors to the recipe to change them up a bit.
- Drizzle caramel or chocolate over the top of the brownies
- Add chopped nuts, chocolate chips (milk or white), or crushed Oreos to the top before baking
- Make them Minty: Use green food coloring in the cream cheese mixture, add 1/2 teaspoon mint extract to the brownie mixture and top with chopped Andes mints then bake.
- Peanut Butter: Add ¼-½ cup peanut butter to the cream cheese layer and top with chopped Reese’s cups or peanut butter chips before baking.
STORAGE: Brownies generally store really well and these are no different. Store the brownies in an airtight container for up to 5 days.
You can also freeze them for up to 3 months. You can either wrap the entire block up or wrap the individual pieces. Wrap in plastic wrap then again with aluminum foil, or place the wrapped pieces in a freezer Ziploc.

For more great brownie recipes:

Cheesecake Brownies
Ingredients
Cheesecake Mixture
- 8 ounces cream cheese, softened
- ¼ cup sugar
- 1 egg
- 1 cup white chocolate chips
Brownie Mixture
- ¼ cup unsalted butter, cold and cubed
- 1 cup milk chocolate chips
- ½ cup sugar
- 2 eggs
- ⅔ cup all purpose flour
- ½ teaspoon baking powder
- ¼ teaspoon salt
Instructions
- Preheat oven to 350°F.
- In a mixing bowl, combine cream cheese, ¼ cup sugar, and 1 egg and beat until smooth.
- Stir in 1 cup white chocolate chips until well combined. Set aside.
- On the stove, fill a saucepan with water and bring to a boil. Turn off heat and set a heatproof mixing bowl over the water. In the mixing bowl, combine butter and milk chocolate chips; stir until it's just melted and blended. Mix in the remaining ½ cup sugar and 2 eggs.
- In a separate bowl, mix your flour, baking powder, and salt; stir into your chocolate mixture until evenly blended.
- Pour half of your batter into a greased 9×9 baking pan. Spread the cream cheese mixture over the chocolate layer. Top with remaining chocolate mixture. Swirl the top chocolate layer into the cream cheese to make a marble pattern.
- Bake at 350°F for 25 to 30 minutes, or until top is crinkled and center is cooked through. Let cool. ENJOY!
Notes
Nutrition
Nutrition information is automatically calculated, so should only be used as an approximation.
Recipe adapted from AllRecipes.com.
Made it. Ate it. Went to a VERY happy place. Flippen delicious and easy to make!
Haha..love it!! That makes me so happy to hear! Thanks so much for telling me! 🙂
What is the serving size
Well, it’s baked in a 9×9, so you can get maybe 12-15 depending on the size you cut them. Hope that helps!! Thanks!
Everything make brownies they never turn out. When I made these it took forever to cook
Longer than the time stated. But it was definitely worth the wait. They were amazing definitely making these again. Thanks for sharing for your amazing recipe
So, glad they turned out and you liked them!! Ovens are all different, so cooking times will vary. Thank you for letting me know!!
So for anyone who, like me, thought; ick I don’t want to melt the chocolate and make the brownies from scratch. I’ll just use a box mix and use the filling too…this does NOT work and should not be attempted. Lol but the results were still yummy, if messier than intended.
LOL!! Thanks for sharing that!!
These recipes are just great I love going over them over and over again.
You’re too nice! 🙂 Thanks for keep coming back!!
I tried The recipe and it was amazing!! Easy, quick and delicious. Thank you very much!
🙂 Thank you for letting me know and for trying this recipe!!
Should they be stored in the fridge.?
They don’t need to be. They are fine in the pan, as long as you have a lid or cover them. You could even put them in a air tight container. Hope that helps!
I made this for my friend’s birthday and everyone couldn’t get enough of it! Great recipe, this one’s a keeper.
Thanks so much for letting me know!! Glad it was a hit!
Just made these last night for a co-worker and it was a hit. Probably the best brownies I’ve ever had in my life. Definitely will be highlighting these in my blog cause everyone must try these! Thank you!
Thank you for letting me know 🙂 I’m glad they were a hit!
The cheesecake brownie recipe is fantastic!! I made it a week ago, and everyone loved it. Thank you! I had to convert the oven temp (175 c) to suit Australian standards, and it took about 45 mins to bake in a rectangle brownie bake tin. (For any Aussies out there).
Great!! Thank you so much for sharing!! I’m so glad it was a hit!
These have been in the oven over an hour and still not done… Even though the top is browning, the middle isn’t even close! 🙁