
We love homemade bread, and one our favorite recipes is today’s homemade Focaccia bread.
This recipe bakes up with a crisp, golden crust and a tender, airy middle, perfect for dipping, sandwiches, or devouring (it’s so delicious!). Not only is this recipe simple, but an easy overnight chill builds flavor and bubbles, then olive oil, oregano, basil, and flaky sea salt finish it beautifully.
Serve this recipe on its own or with some our favorites like Tomato Basil Soup, Baked Ziti and Fettuccine Alfredo.
Why we think you’ll love it:
- So much flavor. Overnight dough for big flavor with very little hands on time.
- Nooks and crannies. Deep olive oil dimples that bake crisp and delicious.
- Make ahead friendly and great warm or at room temperature.
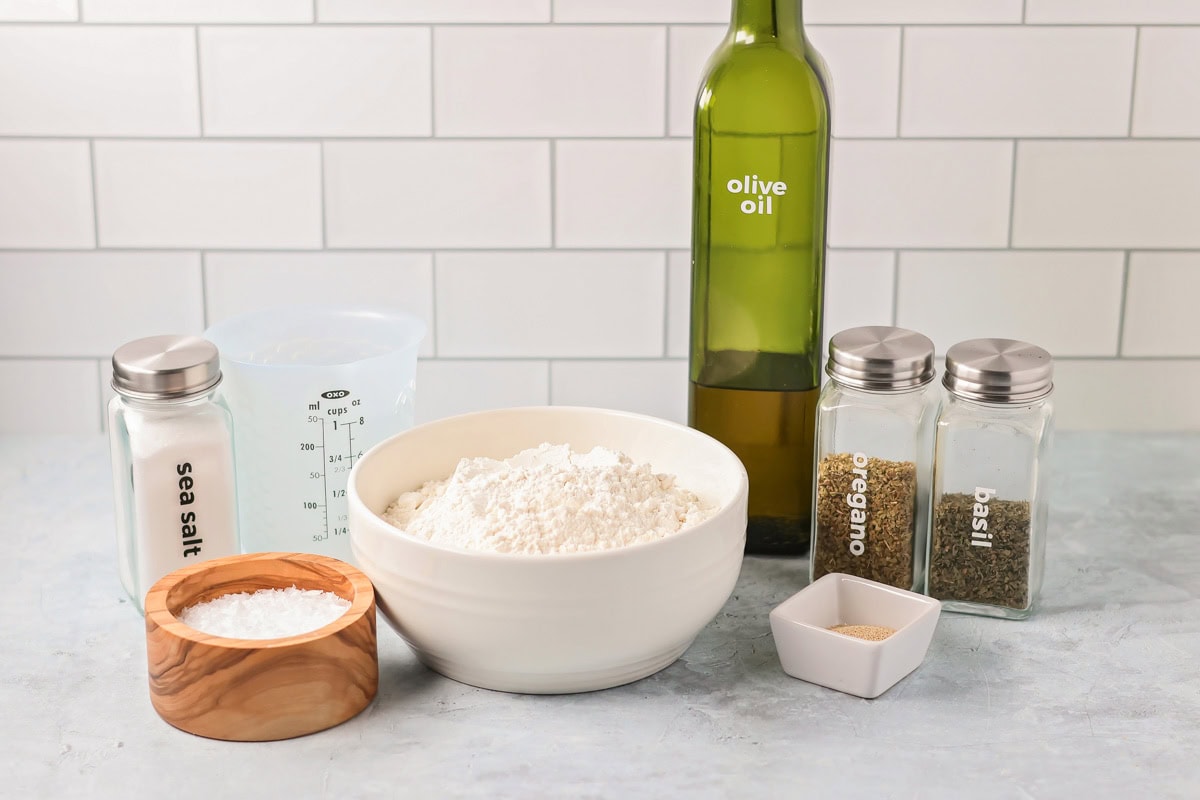
Focaccia Bread Ingredients
- All-purpose flour (2 cups): Forms the gluten structure for a chewy yet tender crumb.
- Salt (1 teaspoon): Seasons the dough and balances the olive oil and herbs.
- Instant yeast (1 1/4 teaspoons): Gives a reliable rise during the chill and the final proof.
- Warm water (1 cup): Hydrates the dough so it mixes quickly and stays soft and sticky.
- Olive oil (1/4 cup): Pooled in the pan and drizzled on top, it creates a crisp, flavorful crust and those signature dimpled pockets.
- Oregano (1 teaspoon): Adds classic Italian aroma that perfumes each bite.
- Dried basil (2 teaspoons): Brings gentle herbal sweetness to the crust.
- Flaky sea salt, Maldon if you like (1 teaspoon): Finishes with crunchy pops of salt that brighten the bread.
How to Make Focaccia Bread
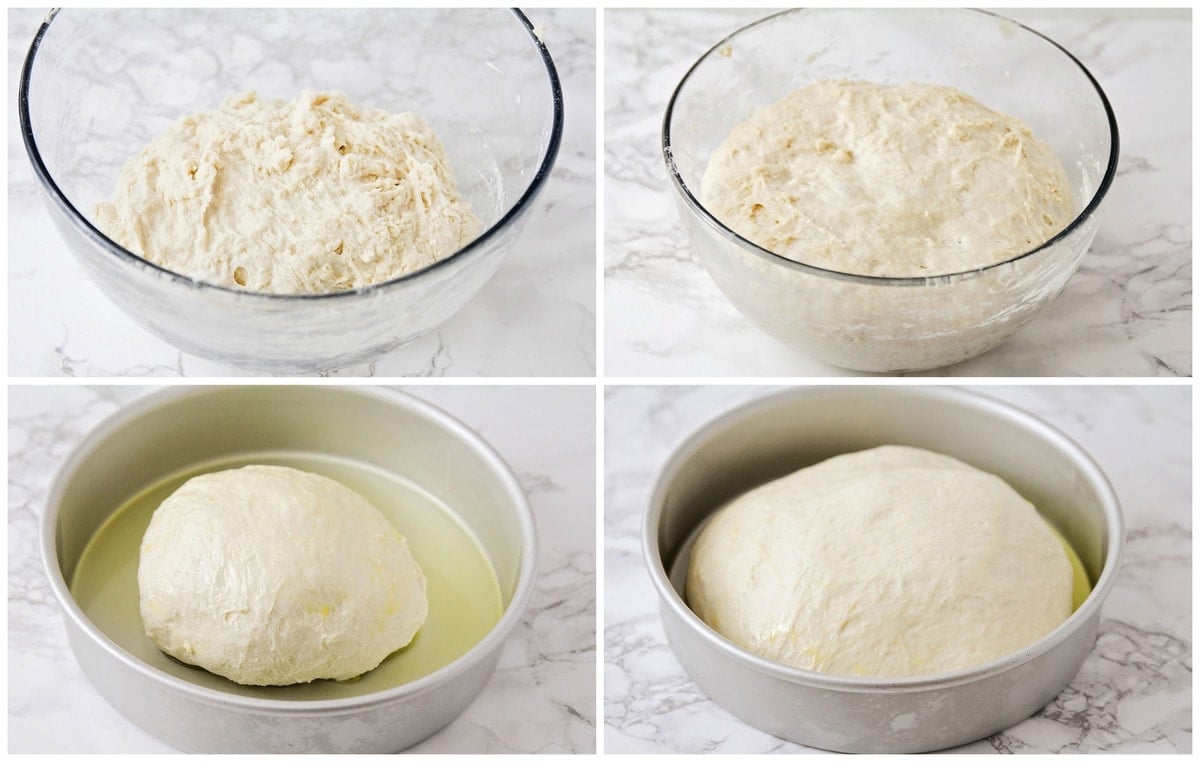
DOUGH. In a medium bowl, whisk together the flour, salt, and yeast. Add the warm water, and stir to form a soft and sticky dough. Cover the bowl with plastic wrap and refrigerate for at least 8 hours, or up to 24 hours.
CHILL, SHAPE + REST. After the dough has chilled, gently shape the dough into a ball with your hands. Pour a tablespoon of olive oil into the bottom of an 8 inch cake pan and spread it to cover the interior surfaces of the pan.
Place the ball of dough in the center of the pan and cover tightly with plastic wrap. Let sit at room temperature for 2 hours, or until the dough has expanded to nearly fill the cake pan.

BREAD TOP. Toward the end of the rise time, preheat the oven to 450. Remove the plastic wrap from the pan. Drizzle the remaining olive oil over the dough, then press your fingers down into the dough, pushing to the bottom of the pan.
BAKE. Repeat until the entire surface of the dough is covered in deep dimples. Sprinkle with the oregano, basil and sea salt. Bake 22-25 minutes, or until golden brown and crisp.

Kristyn’s Recipe Tips
- Keep the dough sticky, resist adding extra flour, the hydration makes the crumb airy.
- Oil the pan generously and dimple to the bottom so olive oil collects in little wells.
- Let it rise until it nearly fills the pan before baking for the best lift.
- Other spices: Rosemary, Fresh or roasted garlic, olive slices, sun-dried tomatoes, shredded cheese (parmesan would probably work best!)
- For extra crunch, bake on the lower third rack and let it rest 5 minutes before lifting out.
- You can leave the dough in the fridge for up to 24 hours, so you can bake it when it’s convenient for you.


Focaccia Bread Recipe
Video
Ingredients
- 2 cups all-purpose flour
- 1 teaspoon salt
- 1 1/4 teaspoons instant yeast
- 1 cup warm water
- 1/4 cup olive oil
- 1 teaspoon oregano
- 2 teaspoons dried basil
- 1 teaspoon flaky sea salt I used Maldon salt
Instructions
- In a medium bowl, whisk together the flour, salt, and yeast. Add the warm water, and stir to form a soft and sticky dough. Cover the bowl with plastic wrap and refrigerate for at least 8 hours, or up to 24 hours.
- After the dough has chilled, gently shape the dough into a ball with your hands. Pour a tablespoon of olive oil into the bottom of an 8 inch cake pan and spread it to cover the interior surfaces of the pan. Place the ball of dough in the center of the pan and cover tightly with plastic wrap. Let sit at room temperature for 2 hours, or until the dough has expanded to nearly fill the cake pan.
- Toward the end of the rise time, preheat the oven to 450. Remove the plastic wrap from the pan. Drizzle the remaining olive oil over the dough, then press your fingers down into the dough, pushing to the bottom of the pan. Repeat until the entire surface of the dough is covered in deep dimples. Sprinkle with the oregano, basil and sea salt.
- Bake 22-25 minutes, or until golden brown and crisp.
Notes
Nutrition
Nutrition information is automatically calculated, so should only be used as an approximation.
Recipe FAQ
Make ahead and storage, cool completely, wrap, and keep at room temp 1 day; rewarm at 350°F for 6 to 8 minutes; freeze up to 2 months and thaw wrapped.
We like to wrap the bread in plastic wrap and then in a freezer-safe storage bag. This can be stored for up 4-6 weeks in the freezer.
More Like This
Bread Recipes
White Bread
3 hrs 15 mins

Whole Wheat Bread
3 hrs 15 mins
Easy Sandwich Bread Recipe
3 hrs 50 mins

No Knead Bread
3 hrs 14 mins
Collections


This recipe was first posted May, 2019.


This was PHENOMENAL!!! Im Sooo glad i gave it a try. It was my first time making bread of anY kind and wow! Just wow! Followed it step By step and we were droOling. Thank you!
Yay!! Love to hear that! Happy you tried it! Thank you!
Hey! i have a question, i let my dough chill for about 12 hours in the fridge and when i took it out it had risen more than i anticipated. then, it was insanely sticky and not really firm enough to be in a ball, more of a melty disk? any ideas for my predicament? It is doing the two hour rest right now, so we will see how it turns out
Hello! This recipe is from a contributor, Alicia at http://www.thebakerupstairs.com/. I would suggest leaving her a comment for this recipe, since she is familiar with it. Hope she can help you!
I’ve been making this every week for the past month – each time, it’s perfect and so yummy! Thank you.
You are welcome!! I am so glad you make it often! Thanks!
I love this recipe! I have made it four tImes now. It always turns out delicious. i do havE a question though, i feel like i follow INSTRUCTIONS exactly but my ball is always much mOre wet for the second rise. It is also mushy when im putting my fingers through. I have experimented with all riSe times. I would love to have feedback of what i May be doing wrong? Thank you! Either way its always delicious
This recipe is from my contributor, Alicia at http://www.thebakerupstairs.com/. You may want to leave her a question on her site. She’ll be able to answer you faster 🙂
This recipe is so easy and so good. Perfect every time! Perfect for tWo…
Glad you think so 🙂 Thank you for letting me know!
THIS IS THE EASIEST AND MOST DELICIOUS BREAD EVER! ANY AMATEUR BAKER CAN SUCCEED WITH THIS RECIPE. I MAKE IT VERY OFTEN, AND HAVE GOTTEN COMPLIMENTS AND REQUESTS FOR THE RECIPE EVERY SINGLE TIME I’VE SHARED IT WITH SOMEONE. THE RIGHT AMOUNT OF FLAVOR AND CRUNCH. WE LOVE TO USE IT FOR DIPPING IN SOUPS, OR USING IT FOR SANDWICHES.
Thank you for sharing the recipe with others! Glad it’s a hit!
I’ve made this recipe before and it turned out absolutely perfect and tasted so great. I now wanted to try making it for a friend who is gluten free – is it okay to just substitute the regular flour for gluten free flour?
Yes, it should be ok 🙂 I hope your friend likes it! Thank you!
this recipe was easy to make and the end result was excellent. I will be making this one over and over again. Thank you
Glad to hear that! Thank you for letting me know!
This recipe sounds like my kind of recipe—easy. I’ll be trying it real soon.
It is! I hope you like it!
Aaaaaaamazing! It turned out so good!
Oh, I am so glad! Thank you for letting me know!