This post may contain affiliate links. Please read our disclosure policy.
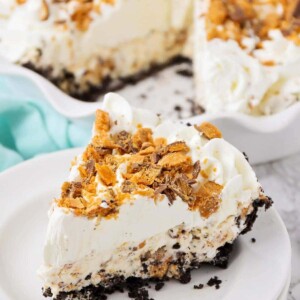
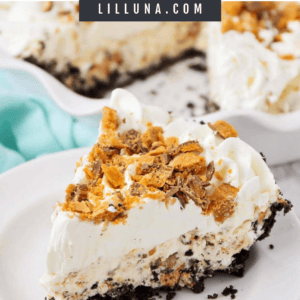
Indulge in this unbelievably delicious Butterfinger Pie with an Oreo crust and homemade Butterfinger ice cream filling!

Who Doesn’t Love Butterfingers?!
We love a refreshing chilled dessert, especially in the summer! A frozen pie is always a crowd-pleaser. Throw in one of the most popular candies around, and it’s even that much more of a hit!
This rich and creamy Butterfinger pie is an indulgent treat perfect for BBQs and parties or a cool summer dessert recipe.
Why we love it:
- Flavor explosion. The Oreo crust provides a rich and chocolatey base that perfectly complements the creamy Butterfinger filling.
- For all occasions. More than summer, it’s a tasty unconventional treat for holidays like Thanksgiving and Christmas for those who prefer chocolate over fruit pies.
- Make ahead of time. This quick and easy dessert makes an impressive presentation and can be frozen – perfect for parties!

Ingredients
- PREP TIME: 10 minutes
- COOK TIME: 10 minutes
- FREEZE TIME: 4 hours
Chocolate Crust
- 18 Oreos, finely crushed – To crush the Oreos, pulse them in a food processor or put them in a large Ziploc bag and use a rolling pin or the bottom of a cup to smash them.
- 3 tablespoons unsalted butter, melted
Filling
- 1 cup heavy whipping cream
- 7 ounces sweetened condensed milk, (half of a 14 ounce can) – do not use evaporated milk
- ½ teaspoon vanilla extract
- 8 snack-sized Butterfinger bars, chopped
Toppings
- 1 cup heavy whipping cream
- ⅓ cup powdered sugar
- ½ teaspoon vanilla extract
- 3 snack-sized Butterfinger bars, chopped
Ingredient Tip
This recipe used a total of 11 fun-size Butterfinger candy bars. You can also use 4 regular-size Butterfinger candy bars.

How to make Butterfinger pie
- CHOCOLATE CRUST. Combine 18 crushed Oreo cookies and 3 tablespoons melted butter; press into a 9-inch pie pan. Bake at 375°F for 10 minutes.
- Cool completely. Place the crust in the freezer while you prepare the filling.
- FILLING. Beat 1 cup heavy cream until stiff peaks form. Add 7 ounces sweetened condensed milk and ½ teaspoon vanilla and beat until smooth.
- Fold in 8 snack-sized chopped Butterfingers.
- Pour filling into the crust and freeze for 4-6 hours.
- TOPPING. Beat 1 cup heavy cream until stiff peaks form. Beat in ⅓ cup powdered sugar and ½ teaspoon vanilla.
- Use a rubber spatula or spoon to spread the whipped topping or use a piping bag with a decorative tip to pipe the whipped topping. Top with the chopped 3 snack-sized Butterfinger bars.
- Serve it right after adding the cream topping and have it slightly soft, or freeze it longer and have the whole thing frozen together.

More Like This
- More frozen desserts: Frozen Strawberry Dessert, Peppermint Ice Cream Dessert, Angel Food Ice Cream Cake
- More frozen pies: Frozen Peanut Butter Pie, Lemon Icebox Pie, Mud Pie
More collections: Best Pie Recipes, Summer Desserts
Butterfinger Pie
Equipment
Ingredients
Chocolate Crust
- 18 Oreos, finely crushed
- 3 tablespoons butter, melted
Filling
- 1 cup heavy whipping cream
- 7 ounces sweetened condensed milk, (half of a 14 ounce can)
- ½ teaspoon vanilla extract
- 8 snack sized Butterfinger bars, chopped
Topping
- 1 cup heavy whipping cream
- ⅓ cup powdered sugar
- ½ teaspoon vanilla extract
- 3 snack sized Butterfinger bars, chopped
Instructions
Chocolate Crust
- Combine crushed Oreo cookies and melted butter; press into a 9-inch pie pan. Bake at 375°F for 10 minutes.
- Cool completely. Place the crust in the freezer while you prepare the filling.
Filling
- Beat heavy cream until stiff peaks form. Add sweetened condensed milk and vanilla and beat until smooth. Fold in chopped Butterfingers.
- Pour filling into the crust and freeze for 4-6 hours.
Topping
- Beat heavy cream until stiff peaks form. Beat in powdered sugar and vanilla. Spread over frozen pie. Top with the chopped Butterfinger bars.
- Serve it right after adding the cream topping and have it slightly soft, or freeze it longer and have the whole thing frozen together.
Notes
Nutrition
Nutrition information is automatically calculated, so should only be used as an approximation.
Recipe FAQ
variations?
- Make a Graham Cracker Crust.
- Add more chopped Butterfingers into the filling and on top.
- Add ½ cup of creamy peanut butter to the cream filling.
- Use store-bought Cool Whip instead of Homemade Whipped Cream.
- Try a different candy bar like Twix, Snickers, or Reese’s!
make frozen Butterfinger pie ahead of time?
- Since this Butterfinger pie recipe needs to be set in the freezer for several hours before serving, you can make this well in advance. If the pie is completely frozen, set it out to thaw enough to cut and serve.
How to store leftover frozen Butterfinger pie?
- For a softer filling, store the pie in the refrigerator for about 5 days.
How to Freeze?
- Cover the pie with plastic wrap and again with aluminum foil and store in the freezer for up to 3 months.
For More Pies:
Frozen Peanut Butter Pie
2 hrs 28 mins
Oreo Pudding Pie
1 hr 15 mins
Mud Pie
2 hrs 20 mins
S’Mores Pie
5 hrs


Enjoyed this for dessert last night and it was a sweet success! Easy, refreshing and delicious; definitely, a new favorite treat!
I am so happy I found this, I would have never known what I was missing out on because this is one of my new favorite desserts.
The combination of flavors was incredible, and it’s super indulgent. I’m so excited to make it again.
My 10-year old granddaughter and I made this earlier this summer. Easy and truly delicious! A really nice dessert for the freezer that is especially good during the hot months of summer. We will definitely make it again.
Oh I’m so happy to hear that. How fun to make your with granddaughter too! Glad you enjoyed the recipe!
WOW! what a DELICIOUS summer treat. Nice alternative to a plain scoop of ice cream.