This post may contain affiliate links. Please read our disclosure policy.
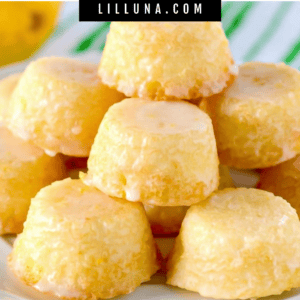
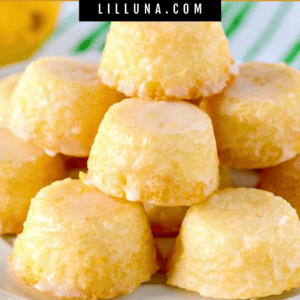
Mini lemon drop cakes are drenched in a mouthwatering lemon glaze making them delicious and addicting and perfectly sweet + tangy!
We love all things mini like fruit tarts, Mini Cheesecake Bites, and donuts. These mini Lemon Drop cakes are a perfect treat for lemon fans.

Easy Lemon Drop Cakes
I am a huge fan of all things lemon, and these Mini Lemon Drop Cakes are my latest experiment.
The original recipe called for a cake mix, but it made 75 lemon drops. I didn’t need that many, so I decided to come up with my own recipe. I am thrilled with how they turned out.
I took them to a bridal shower, and they were a big hit! They are soft and buttery, and the lemon glaze soaks into every nook and cranny, making every bite delectable. Be careful, they are hard to stop eating!
Fresh lemon zest is the secret to incredible lemon flavor, so don’t leave it out. If you love lemons, you are really in for a treat!

How to Make Lemon Drops
PREP. Spray mini muffin pans with non-stick spray; set aside.
DRY INGREDIENTS. Whisk together flour, sugar, salt, and baking soda in a mixing bowl; set aside.
WET INGREDIENTS. Melt butter in a small saucepan over medium heat. Add water and bring to a boil.
COMBINE. Pour hot mixture over dry ingredients and beat with a hand beater till barely blended. Beat in the sour cream, egg, zest, and lemon juice till smooth.
BAKE. Scoop batter into muffin pans. Bake at 325° for about 12 minutes. Let cool for 5 minutes, then turn onto cooling racks. Cool completely before glazing.
MIX. Whisk all glaze ingredients together in a small mixing bowl. Heat for about 10 seconds in the microwave till glaze is very thin.
GLAZE. Dip lemon drops top side down into the glaze. Let excess glaze drip off into the bowl, then invert lemon drops bottom side down onto cooling racks. (Place waxed paper underneath the cooling racks for easier clean up.) Let sit till glaze hardens.

SToring Info
These mini lemon drop cakes might just be the perfect lemony dessert! Here are a few helpful tips you might like before you get started with baking them:
STORE covered on your countertop at room temperature if you plan to eat within a few days.
FREEZE them before you add the glaze. Flash freeze the cakes on a baking sheet for about an hour and then add them to a freezer safe container or Ziploc bag. They will store well frozen for up to 3 months. When you are ready to eat them just thaw out on your countertop and then make the glaze and dip your cakes.
If you love lemon, Here are a few more recipes to try:

Lemon Drop Mini Cakes
Ingredients
- 1 cup all-purpose flour
- 1 cup granulated sugar
- ½ teaspoon salt
- ½ teaspoon baking soda
- ½ cup butter
- ½ cup water
- ¼ cup sour cream
- 1 whole egg
- 1 tablespoon fresh lemon zest
- 1 tablespoon fresh lemon juice
Lemon Glaze
- 1 ½ cups powdered sugar
- 1 tsp fresh lemon zest
- 1 tablespoon butter, melted
- 2 tablespoons fresh lemon juice
- 2 tablespoons milk
Instructions
- Spray mini muffin pans with non-stick spray; set aside.
- Whisk together flour, sugar, salt, and baking soda in a mixing bowl; set aside.
- Melt butter in a small saucepan over medium heat. Add water and bring to a boil.
- Pour hot mixture over dry ingredients and beat with a hand beater till barely blended. Beat in the sour cream, egg, zest, and lemon juice till smooth.
- Scoop batter into muffin pans. Bake at 325° for about 12 minutes. Let cool for 5 minutes, then turn onto cooling racks. Cool completely before glazing.
- Dip lemon drops top side down into the glaze. Let excess glaze drip off into the bowl, then invert lemon drops bottom side down onto cooling racks. (Place waxed paper underneath the cooling racks for easier clean up.) Let sit till glaze hardens.
Lemon Glaze
- Whisk all glaze ingredients together in a small mixing bowl. Heat for about 10 seconds in the microwave till glaze is very thin.
Nutrition
Nutrition information is automatically calculated, so should only be used as an approximation.

Finally a recipe for these wonderful little cakes that does not call for a store bought boxed cake mix!! THANK you ????… and yum! DEliciouS!
Glad to share!! Thank you for saying that!
Hi!! I was wondering how long the baking time would be if cooked in a regular size cupcake pan?
You would need to add maybe 5 more minutes or so. Just keep an eye & you can always add a min at a time, until done. I haven’t made them into regular size, so I am not totally sure.
How long will this last at room temperature
They should be ok for a few days 🙂 I would say, no more than a week.
Love this recipe! DO they need to be refrigerated?
No, they don’t have to be 🙂 Hope you like them!
How many did your recipe make?
It made about 48 🙂
I am a lifelong avid baker and was ANXIOUS to make these, i sprayed my non stick pan as instructed, waited 5 minutes after baking and they did NOT come out easY, , most broke apart, but they taste good…
Oh, darn! I am sorry! Yes, I had to grease it really well & a couple still stuck.
These were so yummy…melt in your mouth goodness! I made them for my hubby to take to work and everyone raved! I’d like to try an orange creamsicle version but not sure if the orange would be a strong enough flavor…thoughts?
That would be good!! Thank you for sharing that! So glad everyone liked them!
These are fantastic! I subbed the sour cream for Greek Yogurt cuz that’s what I had on hand. I also added 1/2 tsp of lemon extract! Made these cupcake size in cupcake liners so they would not stick and baked at 350 for 18 mins! I highly recommend these!
Great!! Thank you for sharing that! So, glad you liked them!
Good flavor but my mini cupckes all stuck To the bottom and came out in pieces. I let them cool and did spray the pan. Cant use these for a party. ?
Oh, darn! I am so sorry! Sometimes, I go a little crazy with the spray, because I know things still stick. I like to sometimes, sprinkle a little flour after I have sprayed. I appreciate you trying them!
Reply to Sally and Kristyn: I call this Magic!
Ingredients
1/2 cup all-purpose flour
1/2 cup shortening
1/2 cup vegetable or canola oil
Mix well, till smooth. Use a brush and ‘paint’ your pans with this (before filling) It’s Magic, Nothing sticks!
I keep a small jar in the fridge. (make any quantity, equal parts of the 3 ingredients) Good Luck
I am looking forward to preparing these lemon cakes!
Thank you for sharing that! I will have to try 🙂
I completely agree that this homemade cake release is fantastic! I use it all the time.
Made these yesterday, and they’re amazing!! I only got 38 out of them using a 1 Tbls. measuring spoon. But I also used the “goop” as bakers call it (equal parts Oil, Shortening, flour) and brushed all of my mini muffin cups REALLy really well and zero sticking.
Now i’m thinking of making these in orange flavor…and maybe strawberry. and my husband is already suggesting a chocolate version with a clear glaze as well!
Thank you for yet another DElicious recipe, kristyn!!
You are so welcome! Great ideas!! That would all be so good!
I loved these cupcakes!!! But to that lady that the cakes stuck to the pan, I greased the pans with crisco, then floured them profusely and it worked great! I also left them in the oven for about 25 minutes which also helped them turn brown on the edges. Hope this helps her. I loved your recipe and used it several times for my friends!
Will try this and let you know.
Sure hope you like them! Thank you!
THis is my second time making these they are delicious light & lemon so good . I have such a time removing from the pan. They look ragged buy the time I get them out . Sides are ok its the bottom , is there a secret ???
I could use paper cups but as its dipped upside down I was not sure . Great for us but not to share
Did you spray really well? I make sure I do. I haven’t tried with the paper liners. After you spray, you could sprinkle with a little flour, too.
i HAD THE SAME PROBLEM…WHEN i MADE THEM AGAIN i PUT THEM IN STURDY LITTLE MINI-PAPERS AND JUST PUT INDIVIDUAL GLAZING ON TOP OF EACH ONE. tHEY WERE MUCH EASIER TO EAT AND LOOKED GREAT ON A DISH. tHEY DEFINITELY ARE A TWO BITE DESSERT, THE PHOTO HERE LOOKS LIKE THEY ARE MUCH BIGGER.