
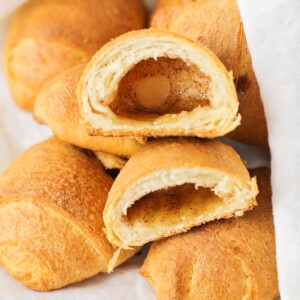
HE is not here, for HE is RISEN! For me, and any Christian, that phrase sends pleasant chills down my spine! Resurrection rolls are a sweet Easter tradition, simple to make and perfect for teaching the story in a hands on way. Tender crescent dough bakes around a cinnamon sugar marshmallow that melts into an “empty tomb.”
It’s important to us that our children know the story of Jesus, the real REASON we celebrate Christmas and Easter. What makes them special is how kid-friendly they are, from dipping marshmallows in butter and cinnamon sugar to sealing the seams before baking. They come out golden with caramelized edges and a soft, hollow center.
For more Easter recipe traditions, try Rice Krispies Easter Nests and Easter Dirt Cake.
Why we think you’ll love it:
- Simple. Five simple ingredients with minimal prep and cleanup.
- Hearfelt. Easy Easter object lesson that little helpers can make and understand.
- Delicious. Golden, cinnamon sugar crust with a fun hollow center after baking.

Resurrection Rolls Ingredients
- Refrigerated crescent dinner rolls (10-ounce can) – Rolls provide a soft, flaky wrapper that bakes golden and creates the hollow “tomb.” The concept of the melting marshmallow will work no matter what dough you use. I like the ease of using the canned crescent roll dough, but thawed Rhodes freezer rolls or your favorite recipe for Homemade Dinner Rolls will also work. Adjust the bake time according to the different dough recipes.
- Large marshmallows (8) – Marshmallows melt into the center during baking, leaving a sweet, empty pocket after cooling.
- Butter, melted (¼ cup) – Butter helps the cinnamon sugar adhere and adds rich flavor.
- Cinnamon (2 teaspoons) – Cinnamon brings a warm spice that perfumes the rolls and balances sweetness.
- Sugar (¼ cup) – Sugar sweetens the coating and caramelizes slightly for a pretty finish.
How to Make Resurrection Rolls


PREP. Preheat the oven to 350°F. Line a baking sheet with a parchment or silicone liner. Open the crescent roll package and separate the rolls into eight triangles.
COAT. In a small bowl, whisk cinnamon and sugar. Dip each of the marshmallows in melted butter, then roll in the cinnamon sugar mixture.


FILL. Place a marshmallow in the middle of each dough triangle, then roll the dough tightly around the marshmallow, pinching to close all of the seams.
- Tuck and roll, place the marshmallow in the center, wrap the shorter corners first, then roll up firmly.
BAKE. Place rolls on the prepared baking sheet. Bake for 10-14 minutes or until golden brown.
- PRO TIP. It’s important to pull them off the baking sheet quickly after baking and use a non-stick liner or parchment paper because the melted marshmallows caramelize and harden when they cool to room temperature and then it gets harder to remove the rolls from the pan.
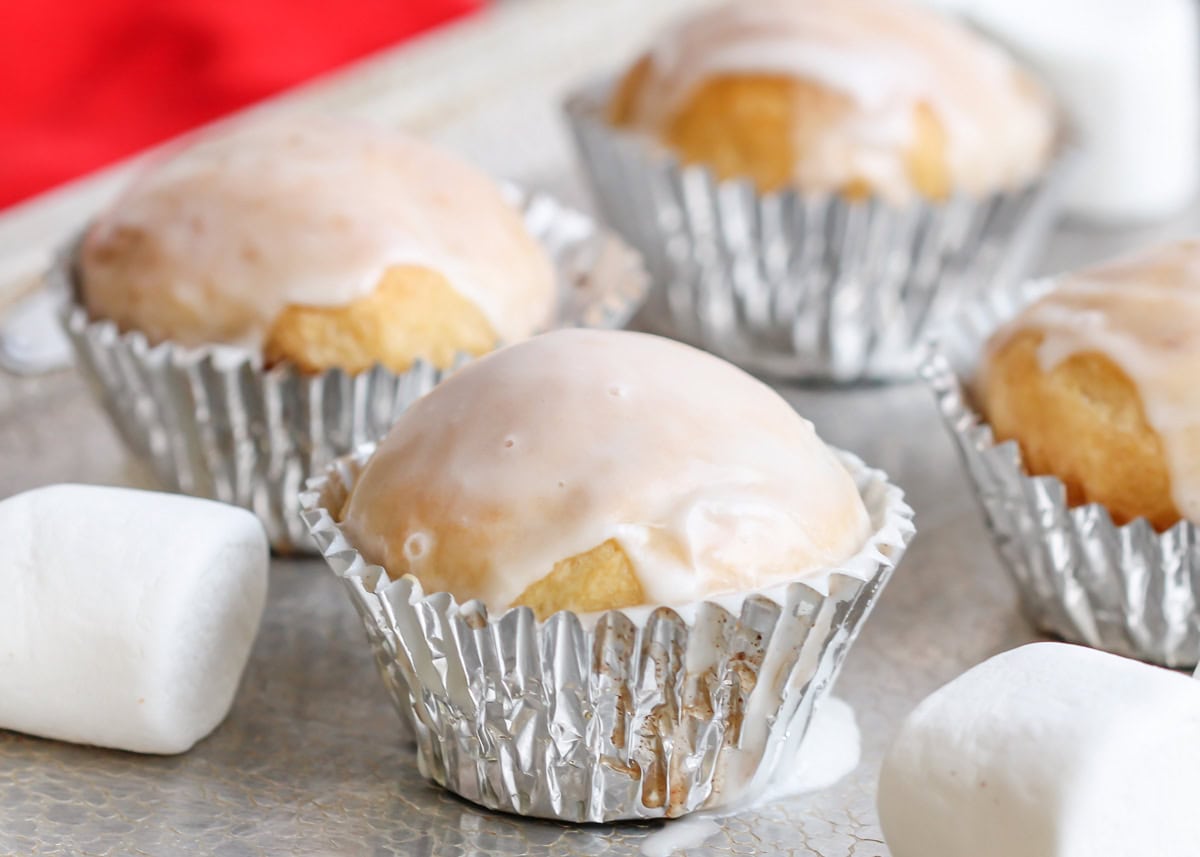
Make them in a Muffin Liner
After you have wrapped the Jumbo marshmallows, dip the dough into the melted butter and place seam-side down into the muffin tin. Bake at 350°F for 8-10 minutes, until puffed and golden. The original recipe called for 12 minutes in the oven, but ours were ready at 8.
To add a glaze:
- 1 cup powdered sugar
- a few tablespoons of milk or heavy cream
- almond extract (optional)
- COMBINE. Mix powdered sugar with drops of milk or whipping cream. Add liquid until the desired consistency is reached.
- GLAZE. Almond extract is optional. Add a few drops and mix until smooth and creamy. Top the warm Easter Rolls with glaze and serve.


Kristyn’s Recipe Tips
- Seal the dough well; the marshmallows will ooze out.
- Seal well, pinch all seams tightly so the marshmallow stays inside while it melts.
- Line the pan, parchment or a silicone liner makes cleanup easy if any filling leaks.
- Serve warm, that is when the centers are glossy and the rolls taste extra soft.
- Focus on the following as you make these together:
- Rolling the marshmallow in the cinnamon and sugar symbolizes when Christ’s friends prepared Jesus’s body for burial with fragrant spices.
- Wrapping the dough around the marshmallow is like wrapping Christ’s body in linens.
- Since Jesus was inside the tomb for 3 days, we sit in front of the oven and watch them bake. We talk about how His friends and family must have felt and share our feelings.
- As the rolls are cooling, we read the account given in Matthew 28:1-6 or in John chapter 20.
- Then we eat, and find the center is empty just like the tomb was on the third day.
Resurrection Rolls Recipe
Video
Ingredients
- 1 (10-ounce) can refrigerated crescent dinner rolls
- 8 large marshmallows
- ¼ cup butter, melted
- 2 teaspoons cinnamon
- ¼ cup sugar
Instructions
- Preheat the oven to 350°F. Line a baking sheet with a parchment or silicone liner. Open the crescent roll package and separate the rolls into eight triangles.
- In a small bowl, whisk the cinnamon and sugar. Dip each of the marshmallows in the melted butter, then roll in the cinnamon sugar mixture.
- Place a marshmallow in the middle of each dough triangle, then roll the dough tightly around the marshmallow, pinching to close all of the seams.
- Place the rolls on the prepared baking sheet. Bake for 10-14 minutes or until golden brown.
Notes
- Seal the dough well; the marshmallows will ooze out.
- Story: Focus on the following as you make these together:
- Rolling the marshmallow in the cinnamon and sugar symbolizes when Christ’s friends prepared Jesus’s body for burial with fragrant spices.
- Wrapping the dough around the marshmallow is like wrapping Christ’s body in linens.
- Since Jesus was inside the tomb for 3 days, we sit in front of the oven and watch them bake. We talk about how His friends and family must have felt and share our feelings.
- As the rolls are cooling, we read the account given in Matthew 28:1-6 or in John chapter 20.
- Then we eat, and find the center is empty just like the tomb was on the third day.
- Make in a muffin liner. After you have wrapped the Jumbo marshmallows, dip the dough into the melted butter and place seam-side down into the muffin tin. Bake at 350°F for 8-10 minutes, until puffed and golden, and add glaze.
- Glaze. You will need 1 cup powdered sugar, a few tablespoons of milk or heavy cream, almond extract (optional). Mix powdered sugar with drops of milk or whipping cream. Add liquid until the desired consistency is reached. Top the warm Easter Rolls with glaze and serve.
Nutrition
Nutrition information is automatically calculated, so should only be used as an approximation.
Recipe FAQ
Put together a little basket of ingredients along with instructions to give to friends with children so they can make these symbolic empty tomb rolls at home. Include a tube of dough, a baggie of marshmallows, and a packet of the cinnamon mixture as well as the recipe instructions and Bible verses.
Once baked, the resurrection rolls will last for 1-2 days when placed in an airtight container.
More Like This
Easter Treats


Collections


This recipe was first shared March, 2021.


I loved making these, this will definitely become a tradition. I used jumbo marshmallows and had to use to triangles to fully cover them, but that was perfect for our little family.
They’re such a fun and meaningful treat to make! I’m glad you love them too!
Not only are they easy to make and delicious but the story is beautiful to tell around the table yearly as a reminder of Christ ,his sacrifice and love for us.
I love that also it brings both meaning and something delicious to your table each year.
Made these last year at Easter with my granddaughters . To my surprise, they asked that I show them how to make them again this year. Guess this will be an Easter tradition.
That is so sweet, what a special tradition to share with your granddaughters!
These are so delicious!!! Thank you for this recipe!
You are so welcome!! Happy to share!
Don’t let the marshmallow leak out and “burn Jesus up in the oven” like I did when my granddau%her was 4yrs old. She is 17 now but still refers to these rolls as the “burned Jesus rolls”.
I’m adding to our list! So easy and turned out delicious! Thank you for helping me teach the kid with this! Such a brilliant idea!