This post may contain affiliate links. Please read our disclosure policy.
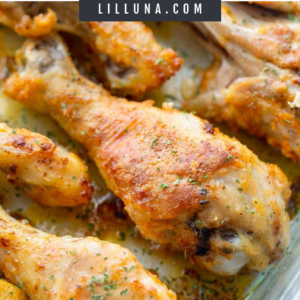
Enjoy this healthier baked alternative to fried chicken, by following these simple steps for Chicken Drumsticks in the Oven!

A Healthy Twist to Love!
We are huge fans of chicken wings and drumsticks! We eat a lot of chicken recipes in general, but wings are the perfect appetizer or a finger-licking main dish.
Chicken drumsticks in oven have all of that crispy flavor with less guilt, just like our Baked Chicken Fingers!
Why we love these:
- Crispy! The batter coating the chicken is light, tasty, and just perfect enough to make you lick your fingers.
- Healthier option. The best part is that it tastes just like Kentucky Fried Chicken but they’re not fried at all – they’re BAKED!!
- Easy. These drumsticks require few ingredients and minimal prep time for an easy dinner idea the kids are going to love!

Chicken Drumsticks in the Oven Ingredients
- 2-3 tablespoons unsalted butter – helps the chicken bake up golden brown and delicious as well as keeps the chicken from sticking to the dish.
- ¾ cup Bisquick mix – Bisquick contains fat, flour, leavening, and seasonings that allow it to crisp up nicely when cooked.
- 1½ teaspoons paprika
- 1¼ teaspoons salt
- ¼ teaspoon black pepper – add more flavor by adding spices like garlic powder, onion powder, red pepper flakes, or a favorite seasoning blend
- 3 pounds chicken drumsticks (chicken legs) – You can use other cuts of chicken but adjust the baking times and temperature.
- spray butter – using spray butter makes it easier to coat the chicken, but you can also brush on melted butter.
Other Cuts of Chicken
Easily substitute other cuts, just adjust the bake times. Bake until the juices run clear. If you have a meat thermometer, check the internal temperature reaches 165°F
- boneless chicken thighs: 400°F oven for about 20 minutes
- bone-in thighs: 425°F for about 40 minutes
- boneless chicken breasts: 400°F oven for about 20 minutes
- bone-in breasts: 375°F for about 35 minutes
- bone-in chicken wings: 400°F oven for about 45 minutes
How To Make Chicken Drumsticks in Oven
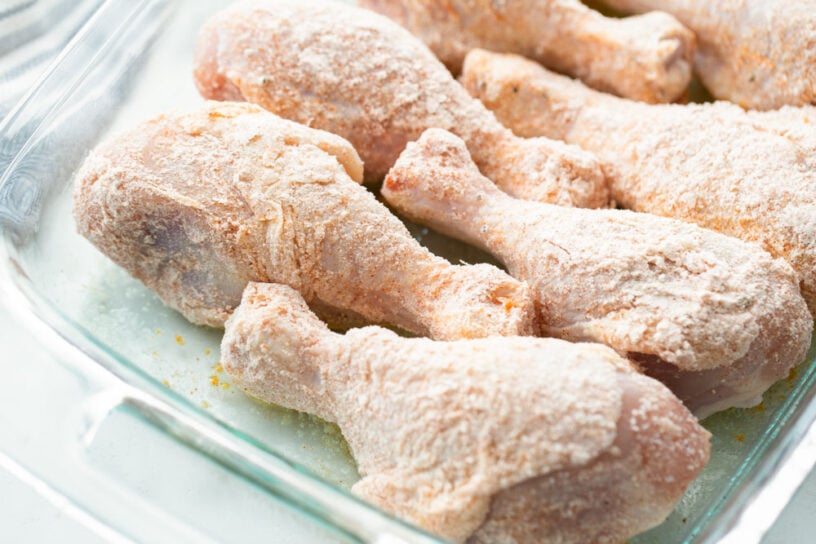
- PREP. Preheat oven to 425°F. Melt 2-3 tablespoons butter in a 9×13 baking dish in the oven. (For easy clean up, line the cooking pan with aluminum foil.)
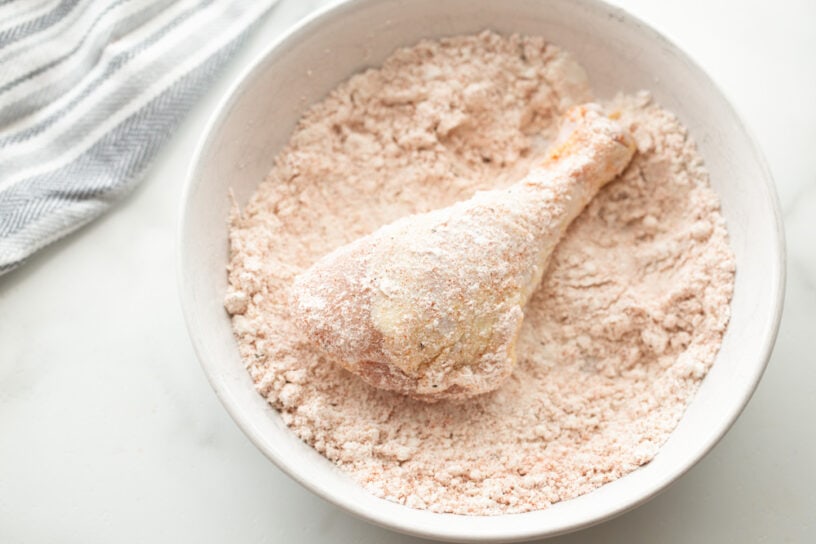
- BATTER. While butter is melting, stir Bisquick, paprika, salt, and pepper in a bowl. Coat each chicken drumstick and place in the baking dish with melted butter.
- Coat with butter before baking and once during baking.
- BAKE. Bake for 30 minutes, flip, and bake an additional 15-25 minutes. ENJOY!!
PRO TIP: For Crispy Skin
The chicken skin covers one side of the drumstick more the the other side. For the crispiest skin, start baking with the skin side down, then flip halfway so the skin side is up during the remainder of the baking time. You can also broil it for a minute or two before removing it from the oven.

Complete the Meal
- Side dishes: Roasted Broccoli, Easy Coleslaw, Homemade Mac and Cheese.
- Desserts: Strawberry Shortcake, Mud Pie, Lemon Sheet Cake
- More chicken dishes: Buttermilk Fried Chicken, Fried Chicken Breast Recipe, Baked Ranch Chicken
More collections: Chicken Breast Recipes, Chicken Dinner Ideas, Healthy Dinner Ideas

Chicken Drumsticks in Oven
Video
Ingredients
- 2-3 tablespoons butter
- ¾ cup Bisquick mix
- 1½ teaspoons paprika
- 1¼ teaspoons salt
- ¼ teaspoon pepper
- 3 pounds chicken drumsticks, chicken legs
- spray butter
Instructions
- Preheat oven to 425°F.
- While butter is melting, stir ¾ cup Bisquick, 1½ teaspoons paprika, 1¼ teaspoons salt, and ¼ teaspoon pepper in a bowl. Coat each chicken drumstick and place in the baking dish with melted butter.
- Coat with butter before baking and once during baking.
- Bake for 30 minutes, flip, and bake an additional 15-25 minutes. ENJOY!!
Notes
Nutrition
Nutrition information is automatically calculated, so should only be used as an approximation.
Recipe FAQ
How to Store Chicken Drumsticks in oven recipe?
- Place leftovers in an airtight container and store in the fridge for 3-4 days.
How to Freeze?
- Place in a freezer-safe Ziploc or container and store for 4-6 months.
- To reheat, place baked chicken drumsticks on a microwave-safe dish, cover with a damp paper towel, heat for 45 seconds flip and heat for 45 seconds more. To heat in the oven place the chicken in an oven-safe dish. Preheat oven to 325°F. Lightly coat the chicken with olive oil, and heat uncovered for 25 minutes.
For More Baked Chicken Recipes:
Baked Chicken Fingers
35 mins

Baked Chicken Wings
30 mins
How to Bake Chicken
35 mins
Baked Chicken Nuggets
35 mins
Adapted from bettycrocker.com.

Can’t find the video
The video appears underneath the “Delicious and More Healthy” heading in the post. It should also appear on the side of the website as you scroll down. An ad may play first, but the video should play right after. 🙂
Fantastic recipe! I bake these in a roaster-type pan, covered in foil at 350 for 2 hours, rotating the legs after an hour. At the end of baking time, I uncover them and turn the temp up to 400 for 10 minutes or until brown and crispy! Soooo delicious! Thank you for this recipe 🙂
You are so welcome! Thanks so much for sharing what you do! I’m so happy they turned out so well!
This is soooooo stinkin’ GOOD!!!! I alWays Make extra bc the leftovers are even better!!! This is a regular at my house now. Easy & delicious!!!!!!
Thank you so much for sharing that! I am happy you like them!
Bake at 425 or 450? The written INSTRUCTIONS are different from the recipe instructions at the bottom.
425 degrees
total hit with the entire family! Paired this with some Mac n’ cheese and green beans. Even my oldest son who’s my picky eater enjoyed it and even asked for seconds. Recipe is super easy to prepare and clean up is a snap as well. I didn’t have bisquick so i substituted krusteaz pancake mix. my family requested i add this to my recipe rotation.
That sounds like a yummy meal! Thank you so much for sharing that!
Great thanks
You are so welcome! Thank you for stopping by!
unless I’m missing this info, is the skin left on or removed? many thanks!
It is on, but whatever you prefer 🙂
I dont have butter spray i have canola spray. Can i use that in ?
Yes, you sure could 🙂 Enjoy!!
It was deliciOUs! Made tHis with chicken wings. Seasoned wings with creole SEASONing first aNd LIGHTLY dipped with one egg. I only put sea salt Into the bIsquicK flour. I made sure there was enough bisquick cOating on all wings. I didnt have Spray butter. I basted the butter from bottom of pan to chicken halfway. Mmmm, love it. So crispy. My HUSBAND was raving about it. Thank you foR the recipe. Its a keeper aNd will make again and again. Yum.
Sounds delish!! Thanks!!
I have a question before I make these. Instead of baking in a buttered 9×13 pan could i bake these on a cooling rack on a cookie sheet instead or does the melted butter help with the crisping?
You could try, but, yes, the butter helps with the crisping 🙂
Delicious
Glad you think so 🙂 Thank you!