This post may contain affiliate links. Please read our disclosure policy.
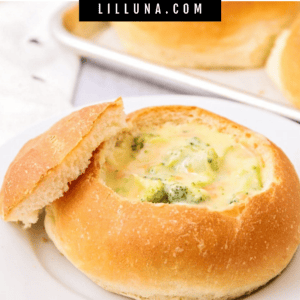
These homemade bread bowls are surprisingly easy to make. Crusty on the outside, soft on the inside, they make a perfect vessel for your favorite soup!
Warm and comforting, these bread bowls are way better than store bought. Undeniably, the BEST way to enjoy a bowl of warm soup. Try filling with these delicious soups: Easy Cheesy Potato Soup, Creamy Tomato Basil Soup, or Italian Sausage Soup.

Easy Homemade Bread Bowls
There is something SO good about eating a delicious soup out of a freshly made bread bowl. It is simply so comforting and honestly good for the soul. Am I crazy? To me, cooking is love!
These pillowy bread bowls only require a handful of ingredients. They are simple, tasty, and freezes well. Fill these beauties with your favorite soup and get your dip on.
These homemade bread bowls are hearty and dense and perfect for filling up with a delicious, comforting soup. Yes, you can definitely serve soup in a bowl, but I think we can all agree it’s even better if served in a delicious bread bowl. And once you try these, you’ll see just how easy they are. 😉

How to Make Bread Bowls
MIX. In a large bowl or the bowl of a stand mixer, mix together the warm water, yeast, sugar, oil, salt, and 2 cups of flour. Add the remaining flour, 1/2 cup at a time, until the dough pulls away from the sides of the bowl and is smooth, but still slightly tacky.
KNEAD & RISE. Knead the dough until smooth and elastic. Place in a greased bowl, cover, and light rise until doubled (about one hour).
FORM. Gently punch down the dough and divide into six equal pieces. Roll each piece of dough into a ball and place on a greased or parchment lined baking sheet. Cut an x in the top of each dough ball.
RISE & PREP. Cover lightly with a kitchen towel and let rise until doubled, about 30-45 minutes. During the last 15 minutes of rise time, preheat the oven to 400.
BAKE. Bake 15 minutes, or until golden brown and cooked through. Remove to a cooling rack to cool completely.
SERVE. To serve, cut a circle out of the top of the bread bowl, then scoop out the inside of the bread to make a bowl. Ladle hot soup into the bowl and serve immediately.

Recipe FAQ + TIPS
Bread Bowls vs Dip Bowls? I usually divide the dough into six bread bowls, and they’re the perfect serving size for my family. If you are using the bread bowls to hold a dip, or just want a bigger portion size, the dough could be divided into fourths instead.
Why do I cut an x on top? This technique is called “scoring” the dough. Many people use this when making beautiful designs into artisan bread. The reason you make cuts, in our case a simple x, is to encourage the bread to evenly rise and expand upwards. Be sure to use a sharp knife when scoring.
Egg wash helps give a crisp shiny finish: Make an egg wash by beating 1 egg with 1 tbsp milk in a bowl. Use a pastry brush to coat the top of each ball of dough right before you score an x on top. For an extra crisp-ness brush again with egg wash halfway during the bake time.
Don’t toss the inside of the bread bowl: the extra bread can be used to make bread crumbs or croutons.
- Crumbs: grind the bread in a food processor until you reach a fine bread crumb texture. Spread the crumbs out on a baking sheet. Heat the overn to 350°F and bake for 5-10 minutes depending on how fine you chopped them. Allow the crumbs to cool before storing them. Crumbs should last for 3-4 weeks at room temp or 3 months in the freezer.
- Croutons: Tear the bread into evenly sized pieces, ½-¾ inche pieces work great. Lightly and evenly coat with olive oil. If you choose to add seasonings such as garlic salt, pepper, onion salt, rosemary etc…Set the oven to 375°F. Spread the bread on a baking sheet in an even layer. Bake for 5 minutes then stir. Repeat until all the pieces are toasted and crip. Store at room temperature for about 2-3 weeks or for about 1-2 months in the freezer.

How to Store?
I love using freshly baked bread bowls for the soup. However, you can STORE them in bread bags 2-3 days before using or placing them in the refrigerator will extend their shelf life a few more days.
You can also wrap them with plastic wrap and again with foil before putting them in the freezer. FREEZE for up to 3 months. Thaw before cutting and using. You can warm them up in the oven as well.
Make Ahead Instructions: If you want to get the dough started and then place it in the fridge/freezer to finish later you can.
After the dough has risen for the first time, punch it down. At this point you can either cover the bowl with plastic and place it in the fridge for 1-2 days or freeze the dough in a Ziploc for up to 2 months. When you’re ready to use it allow the dough to thaw overnight in the fridge. Remove the dough from the fridge and form into dough balls. Continue with the recipe as written.

Soups + Dips Perfect for Bread Bowls
Do bread bowls get soggy? If left filled for too long, all bread bowls will eventually get soggy due to the moisture in the soup. Using a creamier soup will help your bread bowl last longer than if you were to use a more watery soup. Some of our favorite soups to use include:
- Chicken Corn Chowder
- Cauliflower Soup
- Broccoli Cheese Soup
- Cheesy Potato Soup
- Creamy Tomato Basil Soup
Not only can you use bread bowl for soup, but they make fantastic serving dishes for DIPS:

More bread recipes

Bread Bowl Recipe
Equipment
Video
Ingredients
- 1½ cups warm water, (110-115°F)
- 2 tablespoons oil
- 2 tablespoons sugar
- 1 teaspoon salt
- ¾ tablespoon rapid rise yeast
- 4 cups bread flour, plus more as needed
Instructions
- In a large bowl or the bowl of a stand mixer, mix warm water, oil, sugar, salt, yeast, and 2 cups of flour. Add remaining flour ½ cup at a time until the dough pulls away from the sides of the bowl and is smooth, but still slightly tacky.
- Knead the dough until smooth and elastic. Place in a greased bowl, cover, and let rise in a warm place until doubled in size, about 1 hour.
- Gently punch down the dough and divide it into six equal pieces. Roll each piece of dough into a ball and place them on a greased or parchment-lined baking sheet.
- With a sharp knife, cut an x in the top of each dough ball. Cover lightly with a kitchen towel and let rise in a warm place until doubled in size, 30–45 minutes.
- During the last 15 minutes of rise time, preheat the oven to 400°F.
- Bake for 15 minutes or until golden brown and cooked through. Remove to a cooling rack to cool completely.
- To serve, cut a circle out of the top of each bread bowl, then scoop out the inside of the bread to make a bowl. Ladle hot soup into the bowl and serve immediately.
Notes
- Don’t forget to score the dough with an x on top so it will rise evenly and expand upwards.
- Knead until the dough becomes smooth and elastic, and springs back when lightly pressed with your finger.
- Bread bowls are best served with creamier and chunkier soups, as opposed to broth-based soups.
Nutrition
Nutrition information is automatically calculated, so should only be used as an approximation.


Lil Luna is one of those people whose recipes can ALWAYS be trusted!! These bread bowls are amazing, they always come out so beautifully and are a huge hit with the fam!
Thank you so much! I am thrilled you love the bread bowls and that they are such a hit with your family!
Can I make a bread bowl if don’t own a stand-up mixer?
Yes you can! Just mix and knead the dough by hand until it’s smooth and elastic, then shape and bake as directed. It takes a little elbow grease, but the bread bowls will still turn out amazing!
I made the bread bows and they were delicious. We have friends that are gluten free. Do you have a recipe for gluten free bread bowls?
I’m so glad you liked them! I don’t have a gluten free version, but you can usually substitute the flour with a 1:1 gluten free baking flour. If you try it, I’d love to hear how it turns out!
Love it
Last time I tried a bread bowl recipe they were more like bread plates. So excited that these turned out.
This was wonderful ! Used broccoli cheese soup A Keeper!!
I am wondering since I have men eating this can I just make the bills bigger. This said 6 bowls. Someone said they are the size if hamburger buns. I am guessing I will need to double the recipe for 5 bowls. Also do you think this would work for Chilli. I thought about spreading butter all over and sprinkle with garlic salt. Do you think this would work?
Yes, you could certainly make them bigger. You might want to double the recipe in that case. And yes, they would work for chili too! That sounds delicious!
Easy peasy. Couldn’t believe how tasty. Made with chili first time. Today I’m doing with spaghetti. Yummy. We made them a little bigger and sliced the left over and made garlic bread. 😍
After separating into the individual balls, can I leave them outside overnight or must they be refrigerated?
Hi, how can I use active dry yeast instead of rapid rise yeast?
Thank you
Made these today going to have soup in them tonight. I definitely will be doubling the recipe next time to make bigger bowls. They are a lot smaller then I was thinking they’d be.
How fun! Hope you enjoyed the bread bowls!
Hi how can I use active dry yeast instead of rapid rise yeast?
Haven’t made yet but looking forward to. Never made bread before, do u have to use
bread flour or would all-purpose flour work?
You can use either. The bread flour has a higher protein content, so it makes a slightly more chewy texture, but you can use all-purpose if you don’t have bread flour.
I made this dough in my bread machine….worked perfectly!…made two loaves as I wanted one for a dip for the Super Bowl, so that left an extra one. Anyway, who can resist fresh from the oven bread…certainly we can’t, so we tore into the second loaf and ate nearly half of it while it was hot…perfect for spreading with butter! Wow…super delicious, and now I can’t wait to make it again, making individual ones to fill with some hot and creamy soup…maybe the cream of broccoli. I can think of several that would be wonderful! So glad I found your recipe. Thanks! `
Oh you’re welcome! That makes me so happy to hear! I’m so glad the bread turned out and was a hit with your family.
Hello Vicki,
I realize your post was over a year old, but hope you will remember the bread bowl recipe.
I am interested in making this dough in my bread machine. Can you describe the recipe you used and the procedure you followed. Thank you.
This is to Jackie….I made this recipe here that I’m commenting on (Lil’ Luna’s)….I just put the liquid in first, then all other ingredients except the flour and yeast. Then, put in the flour, make a little indentation and add the yeast. When the machine is done, proceed per the recipe. Hope this helps!
Forgot to add…be sure to use the dough cycle. 🙂 Came here to make this recipe and noticed my omission!
I make this monthly and the family requests it more! I use it a Rolls too.
I made the recipe two times today, both times the dough didn’t rise much. I’m in Florida so maybe that has something to do with it, but then it should be noted. I am a novice when it comes to making any bread from scratch. Not sure what was wrong as I followed the recipe. To divide the dough into six sections it’s basically a hamburger bun size. Second time I only divided into four but still small. If anyone ever had a Perkins bread bowl salad, that’s what I was hoping for. They are more like a bread to go with a salad.
Valerie–Possible reasons for dough not rising: The water temperature and the freshness of your yeast are big factors in getting a proper rise of bread dough. Water temperature should be between 105 and 115 degrees fahrenheit. I use a meat thermometer to make sure the temperature is right before adding ingredients to it. This recipe doesn’t call for “proofing” the yeast, but it may be a good idea to do it so you can be sure the yeast is activated before moving on. To proof your yeast, mix the water, yeast, and sugar together first and let it sit for 5-10 minutes before adding the other ingredients and continuing on with the recipe. If the yeast is activated, the mixture will get foamy, then you’re good to go with the rest of the ingredients. Hope this helps. 🙂
I don’t have a comment as I have not made this recipe yet but I wanted to know what is the size of this bread bowl?
I haven’t ever measured the size.. but it makes about 6 bowls per the recipe. So one bowl fills about 1/6 of a sheet pan. Again, not exactly sure the measurement of that, but hopefully that gives a little more of an idea of the size.
These were really good and super easy. I made four bread bowls and they were around 6″ in diameter. Will definitely make these again!
Easy to make and taste great. Vegan as well
I came across your site accidentally . I am acually so HAPPY I did..
I love some of these recipes.. I ca’t thank you enough..
That makes me so happy to hear! Welcome to Lil’ Luna! I hope you enjoy all of the recipes! 🙂
I have made these bread bowls several times and they always turn out. You can’t go wrong with this recipe. Very easy.
So so happy to hear that!
Hi, can I use half whole wheat flour and half bread flour?
quick and easy bread bowl.. Made a great addition to my soup
I have made this recipe to a T twice and bread never rose. What am I doing wrong?
So sorry to hear you are having trouble with the bread rising. It’s hard to know exactly why the bread isn’t rising since there are many reasons that could factor in…. old yeast, water being too warm, kitchen temperature being too cold so it doesn’t proof, etc. Perhaps one of those might be a cause for it not rising!
This recipe is foolproof! I was able to make amazing bread bowls for my husband, who is CRAZY about getting bread bowls from different restaurants. I could never find anything that worked in the grocery store bakery aisles, and I’m so glad I stumbled upon this. He is so excited for this fall & winter to take a thermos of soup and a bread bowl to work. Thank you!
Oh I’m so happy to hear that you both are happy and excited about the bread bowls! They are a favorite around here too.
This was such an easy recipe. I’m not very good at baking, but this was so easy to follow and they came out perfect. Not pretty, but tasted great. My fiancé even loves them without soup in them. I hleven made a broccoli Cheddar soup with them. Love love love. Thank you for this awesome recipe.
You are so welcome!! I am so glad you tried them. Thank you!
quick and super easy… Loved the taste of the bread
Loved them as bread bowls and as leftover bread later !
I didn’t realize how much space they needed around them when rising. I doubled the recipe and put 12 on a pan. Didn’t work as bread bowls, just big soft rolls instead. My goal is to someday make successful bread bowls. They taste good though.
Glad you liked the taste! Don’t give up 🙂
Love this. Love creamy broccoli soup. My daughter loves making bread bowls.
Me too!! Thank you!
What a fun recipe! I love soups in bread bowls, but never really knew how to make them.
Amazing soup recipe ! We all can’t stop raving about how good it was. Thank you for sharing!
Making bread intimidates me but this recipe was easy and a success. I can’t wait to try another one.
Bread bowls are the best way to eat soup! Thanks for sharing this recipe! Looks easy enough!
I made 3 large bowls instead of 6 smaller ones and they turned out perfectly. I served hot seafood dip in one for a dinner party and it was a HUGE hit. BTW, we spelled my daughter’s name the same–Kristyn–very unusual spelling and to see someone else spell hers the same way warms my heart. I lost my Kristyn at Christmastime several years ago in a car accident.
Oh our hearts go out to you. We’re so sorry to hear of the loss of your dear Kristyn. It is a unique and beautiful way to spell the name! We’ll definitely pass the sentiment onto our Kristyn. I’m so happy to hear that the bread bowls turned out great too! Thanks so much for sharing. 🙂
Yum! I am a HUGE fan of soup and breadbowls! I absolutely adore a perfectly creamy soup paired with a delicious bread bowl. Great, easy recipe!
You might think these are hard to make but actually no DifferenT than making bread. Such a yummy edible bowl to serve your soup from.
Made these today! ❤️ So good!! The dough is very similar to french bread recipe we really like. The dough was really easy to work with. I doubled the recipe and made 6 large bowls. We made your cheese ham and potato soup to go inside.
Great! Thank you for sharing that!!
love that these are from scratch, and good walk through, baking is where I’m weakest so I appreciate it!